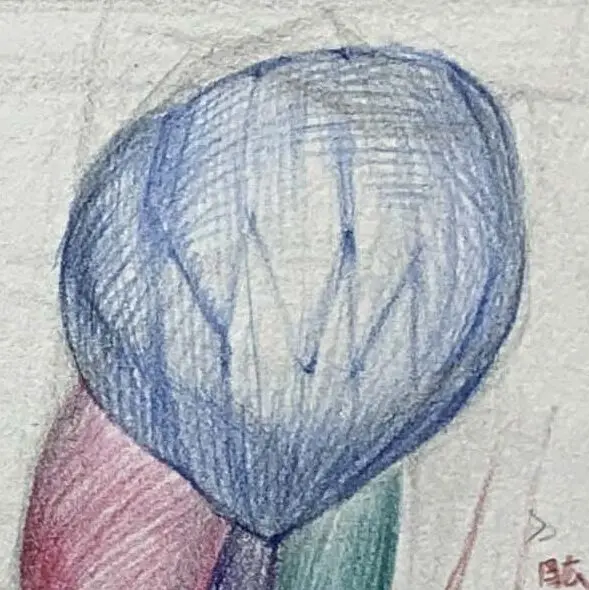
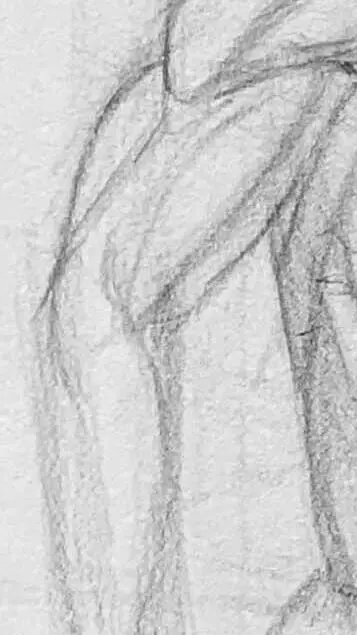
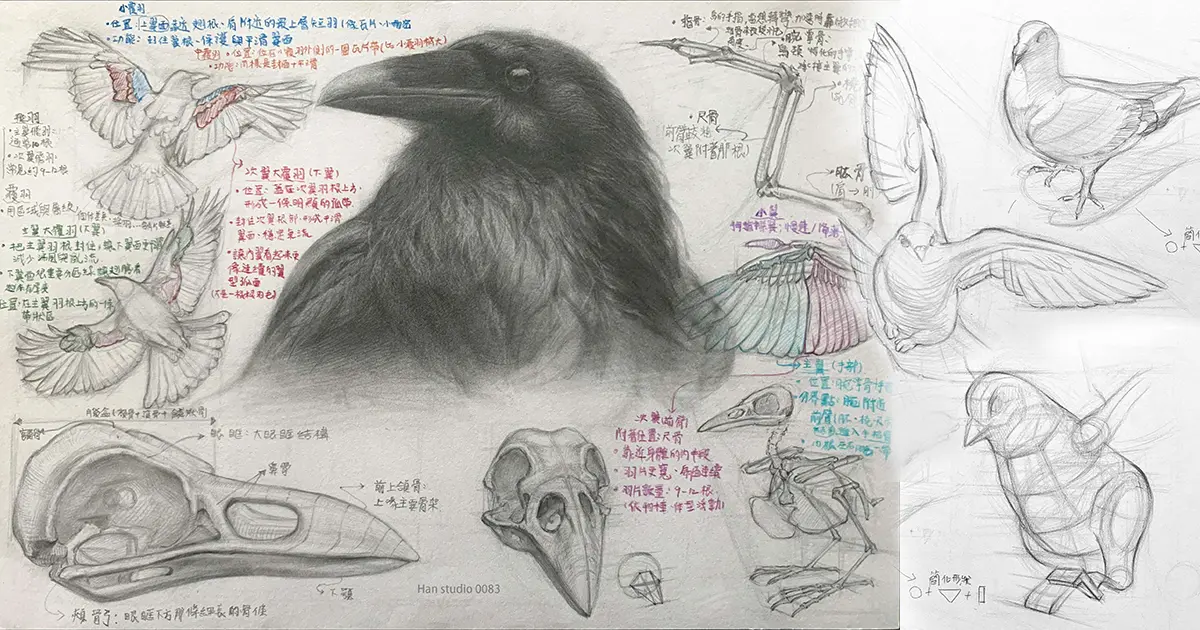
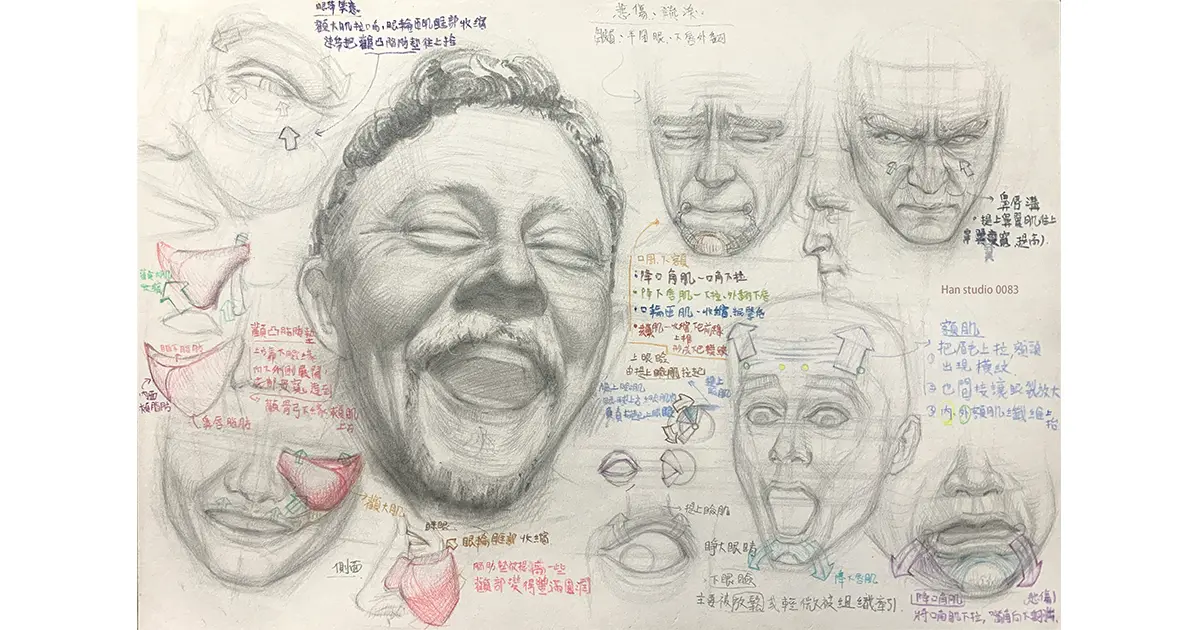
This week's girly plaster project, it's so easy to get itchy and go overboard with the bright colors. Compared to the last few weeks of plastering, this hair has a little more variety 🙋 I'm not sure if I'm going to do this, but I'm sure I'm going to do it again.
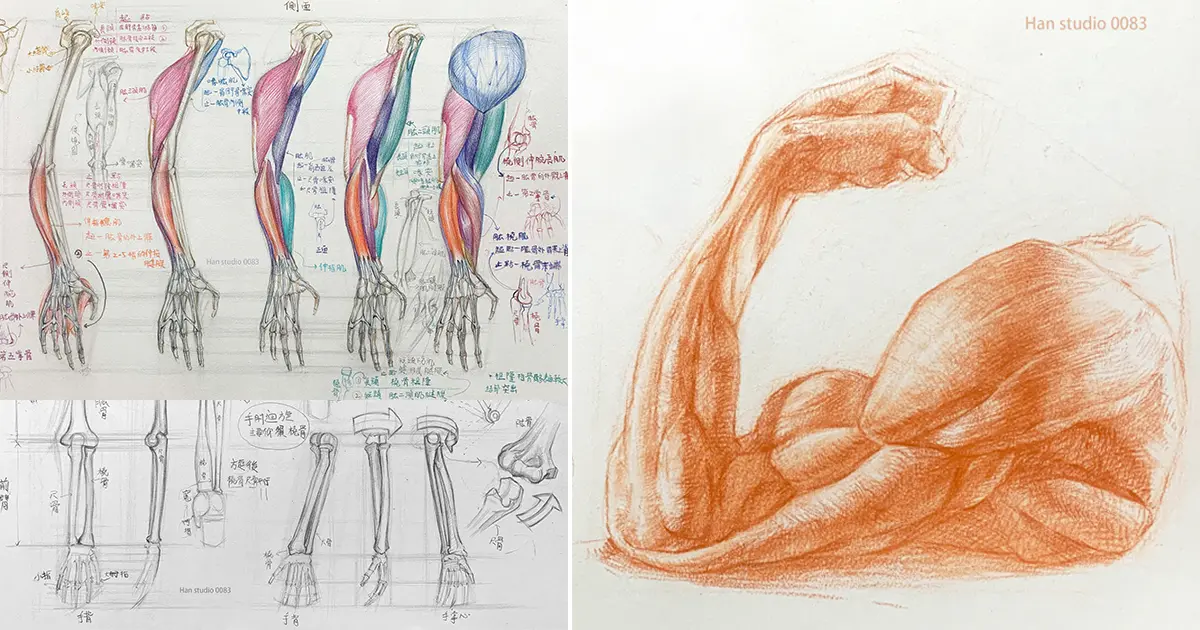
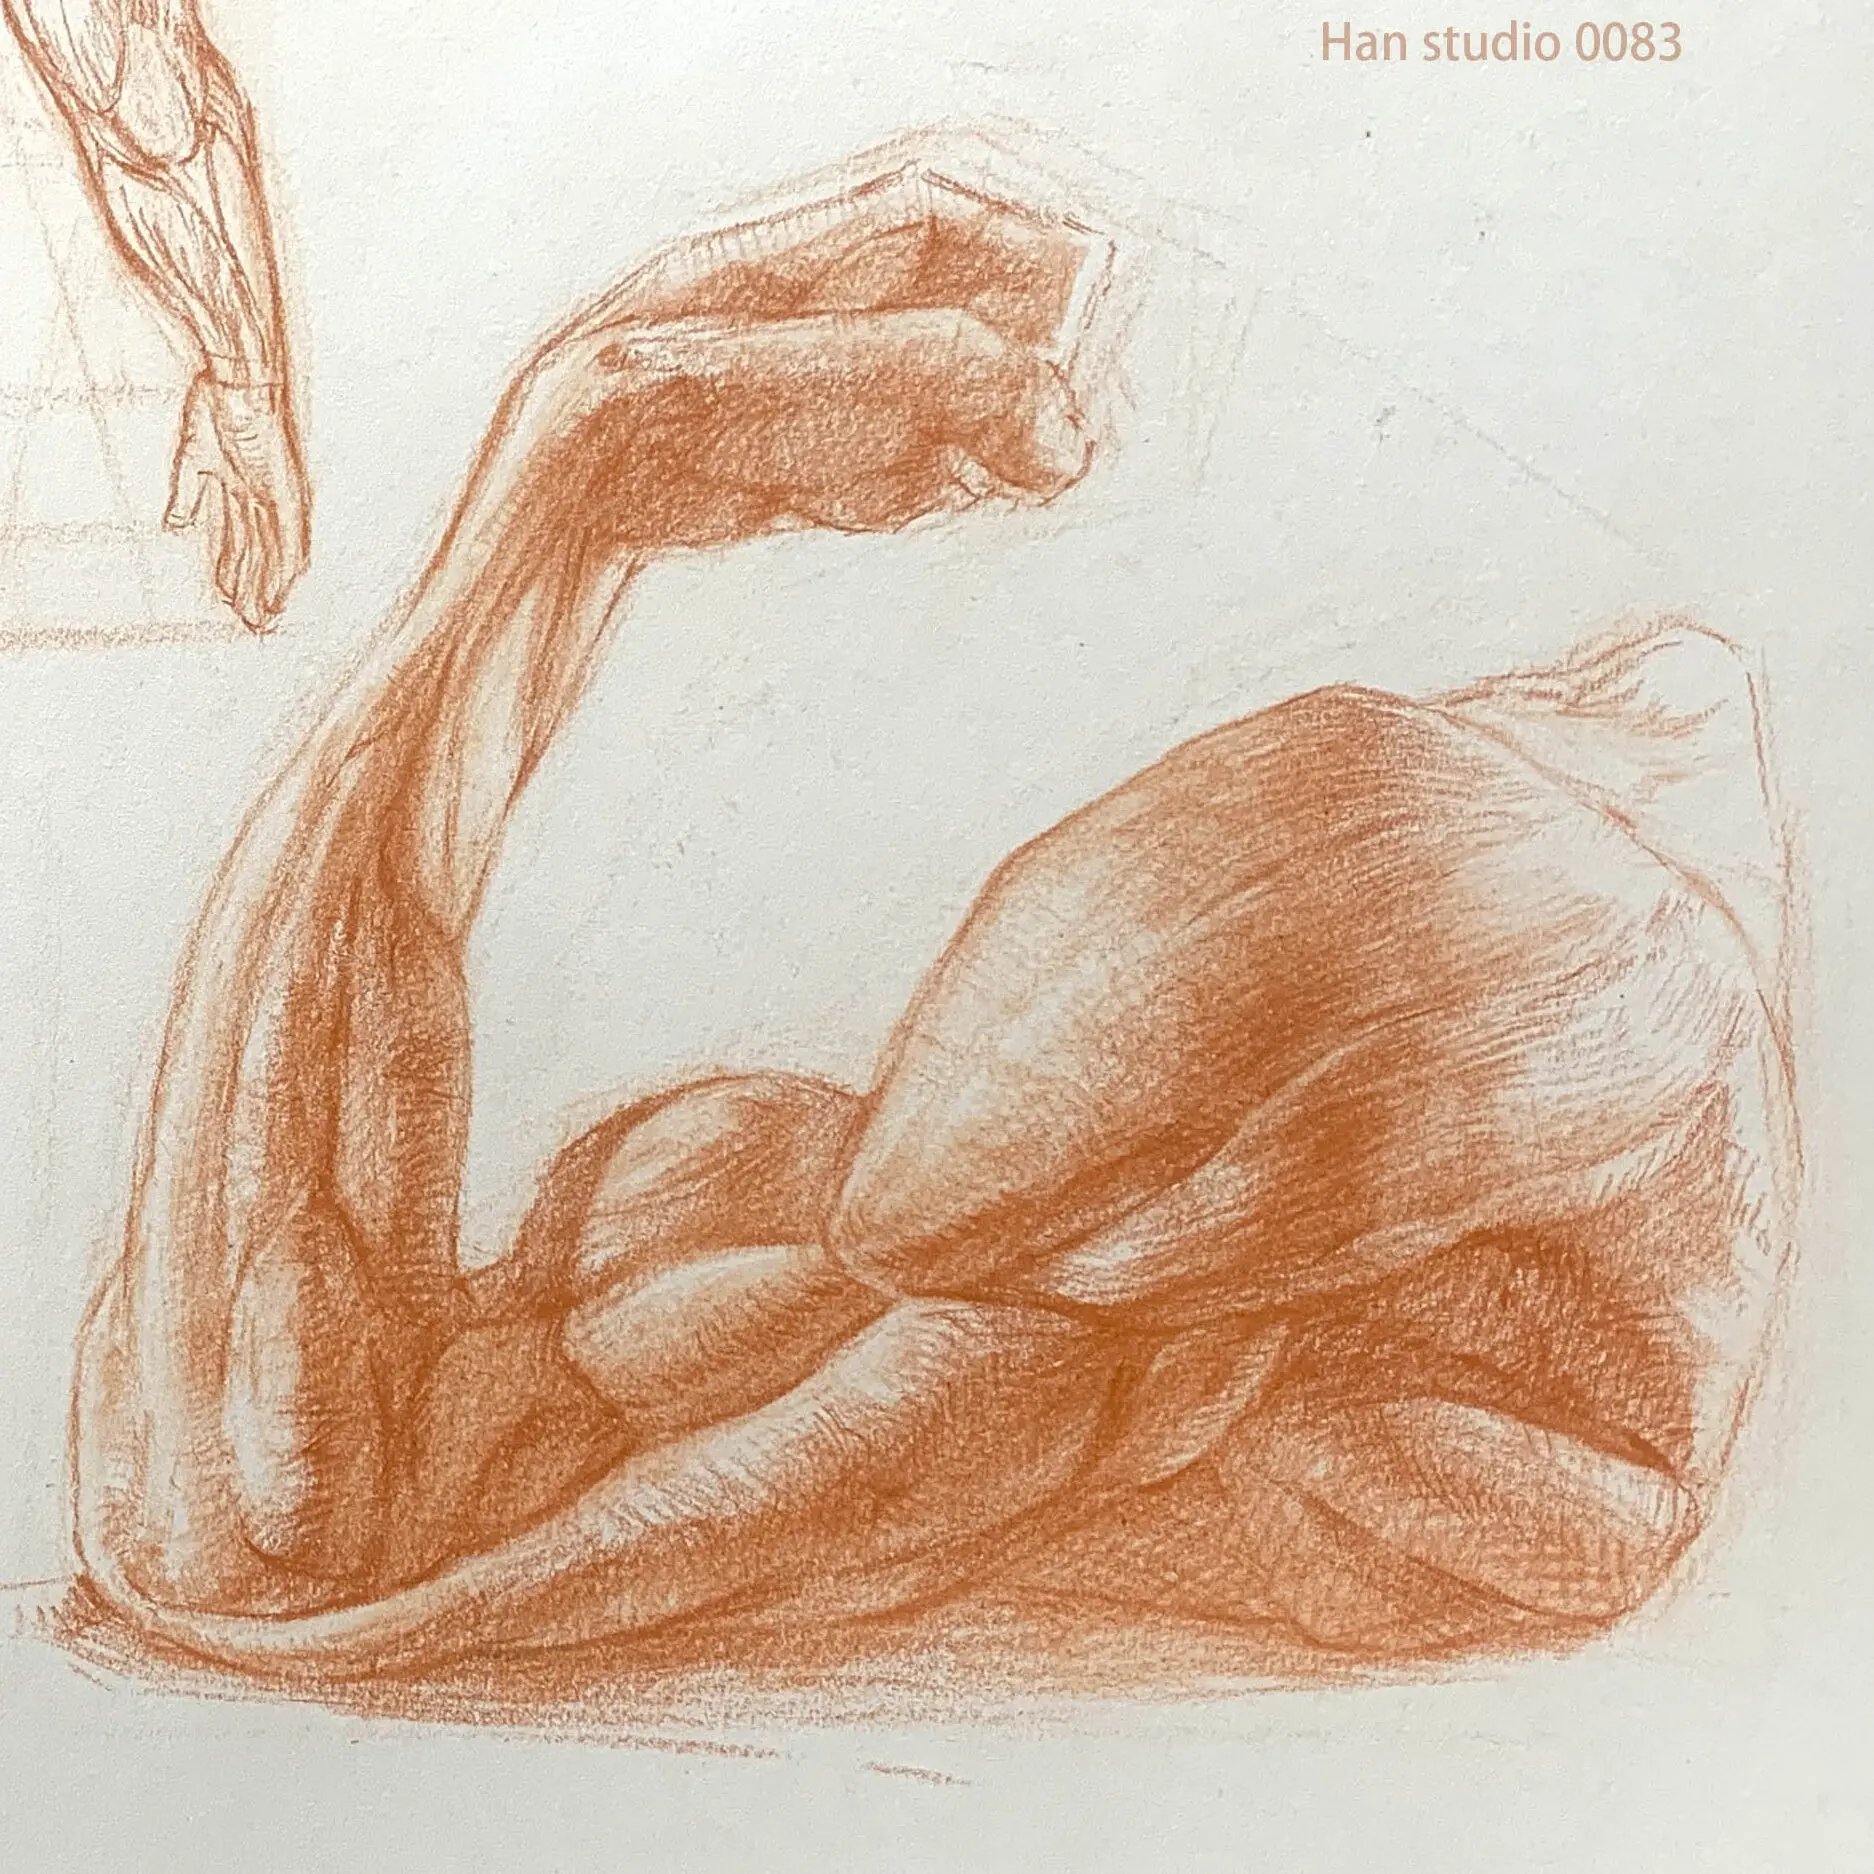
Let's take this time to draw to the cheek rest movement and organize the arm structure, let's go down together!
1. Why do we need to learn the bone and muscle structure of the arm?
Visual persuasion: Accurate muscular form is the only way to add tension and structure to a character's movement.
Motion Communication: Understanding the relationship between flexors vs. extensors helps to draw natural elbow flexion and extension movements.
Light & Shadow: Understanding that the muscle blocks correspond to different light and dark surface sizes effectively helps us to find the points of the shadow transition structure.
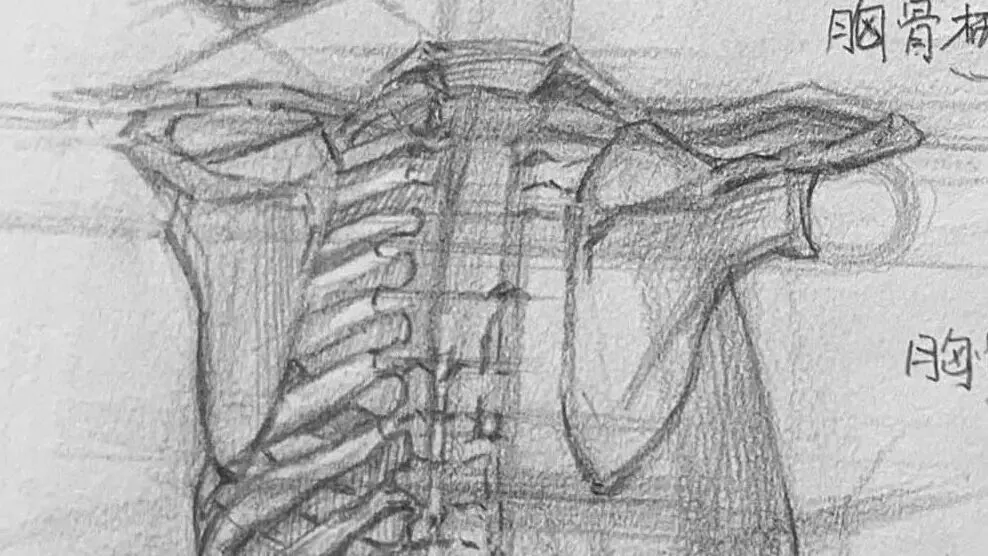
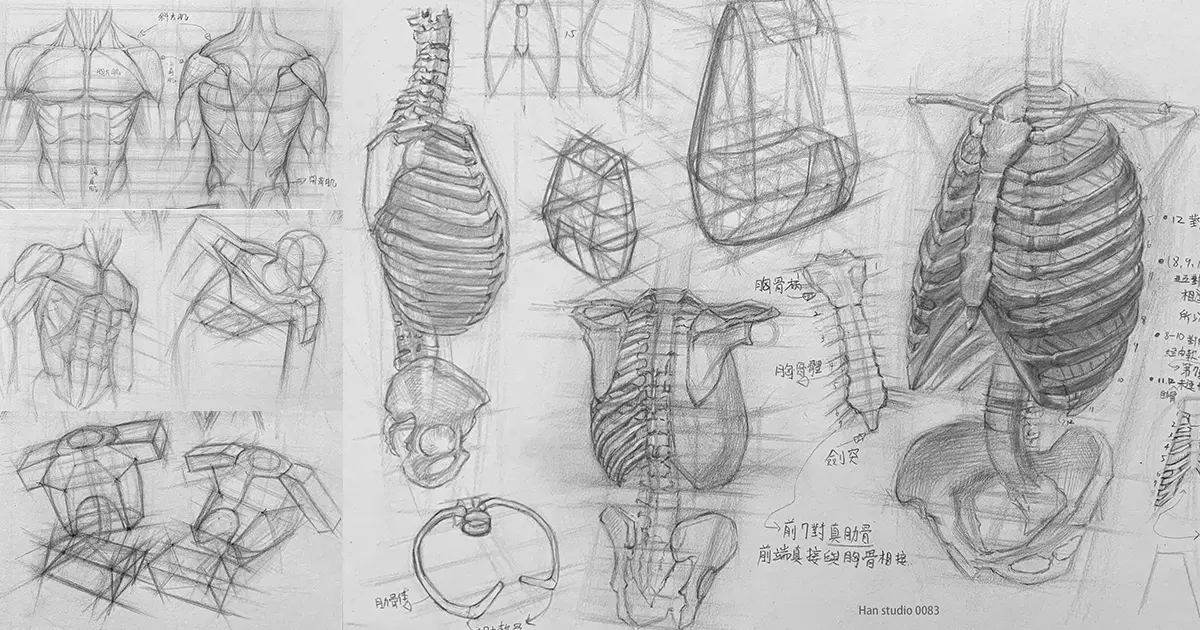
1. Composition and structural function of the bones of the arm.
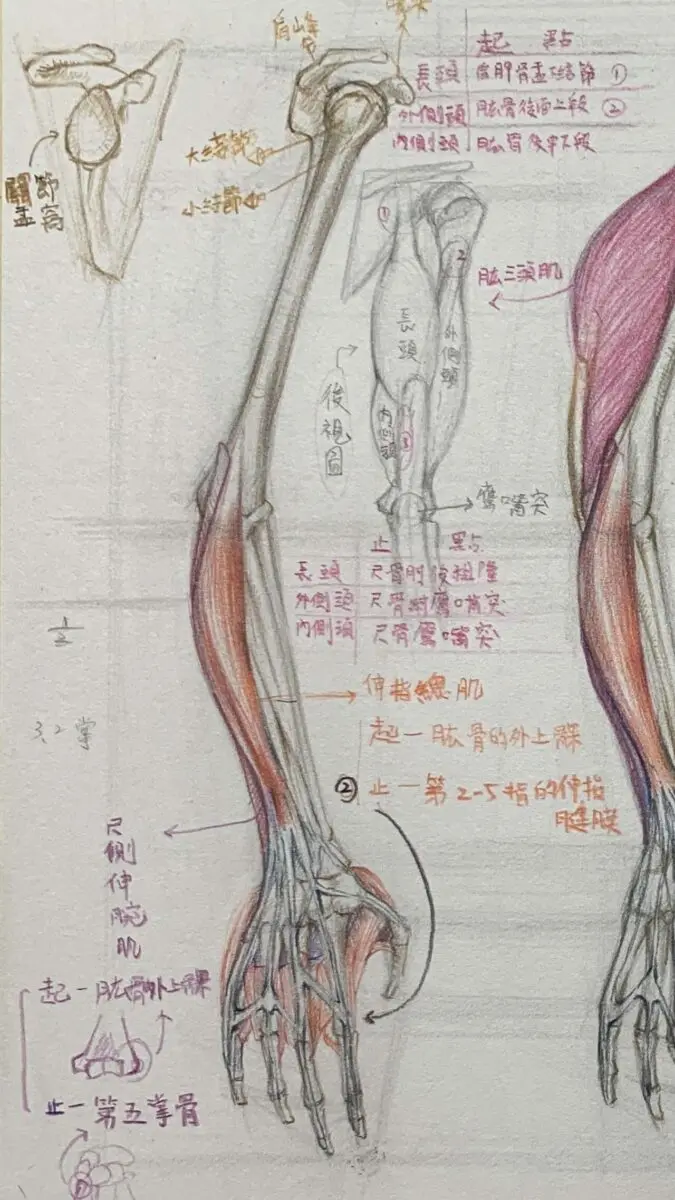
Scapula Position:
In the demonstration, one can see the scapular contour labeled with lines containing the acromion and the rostral eminence.
Dorsal view of the scapula
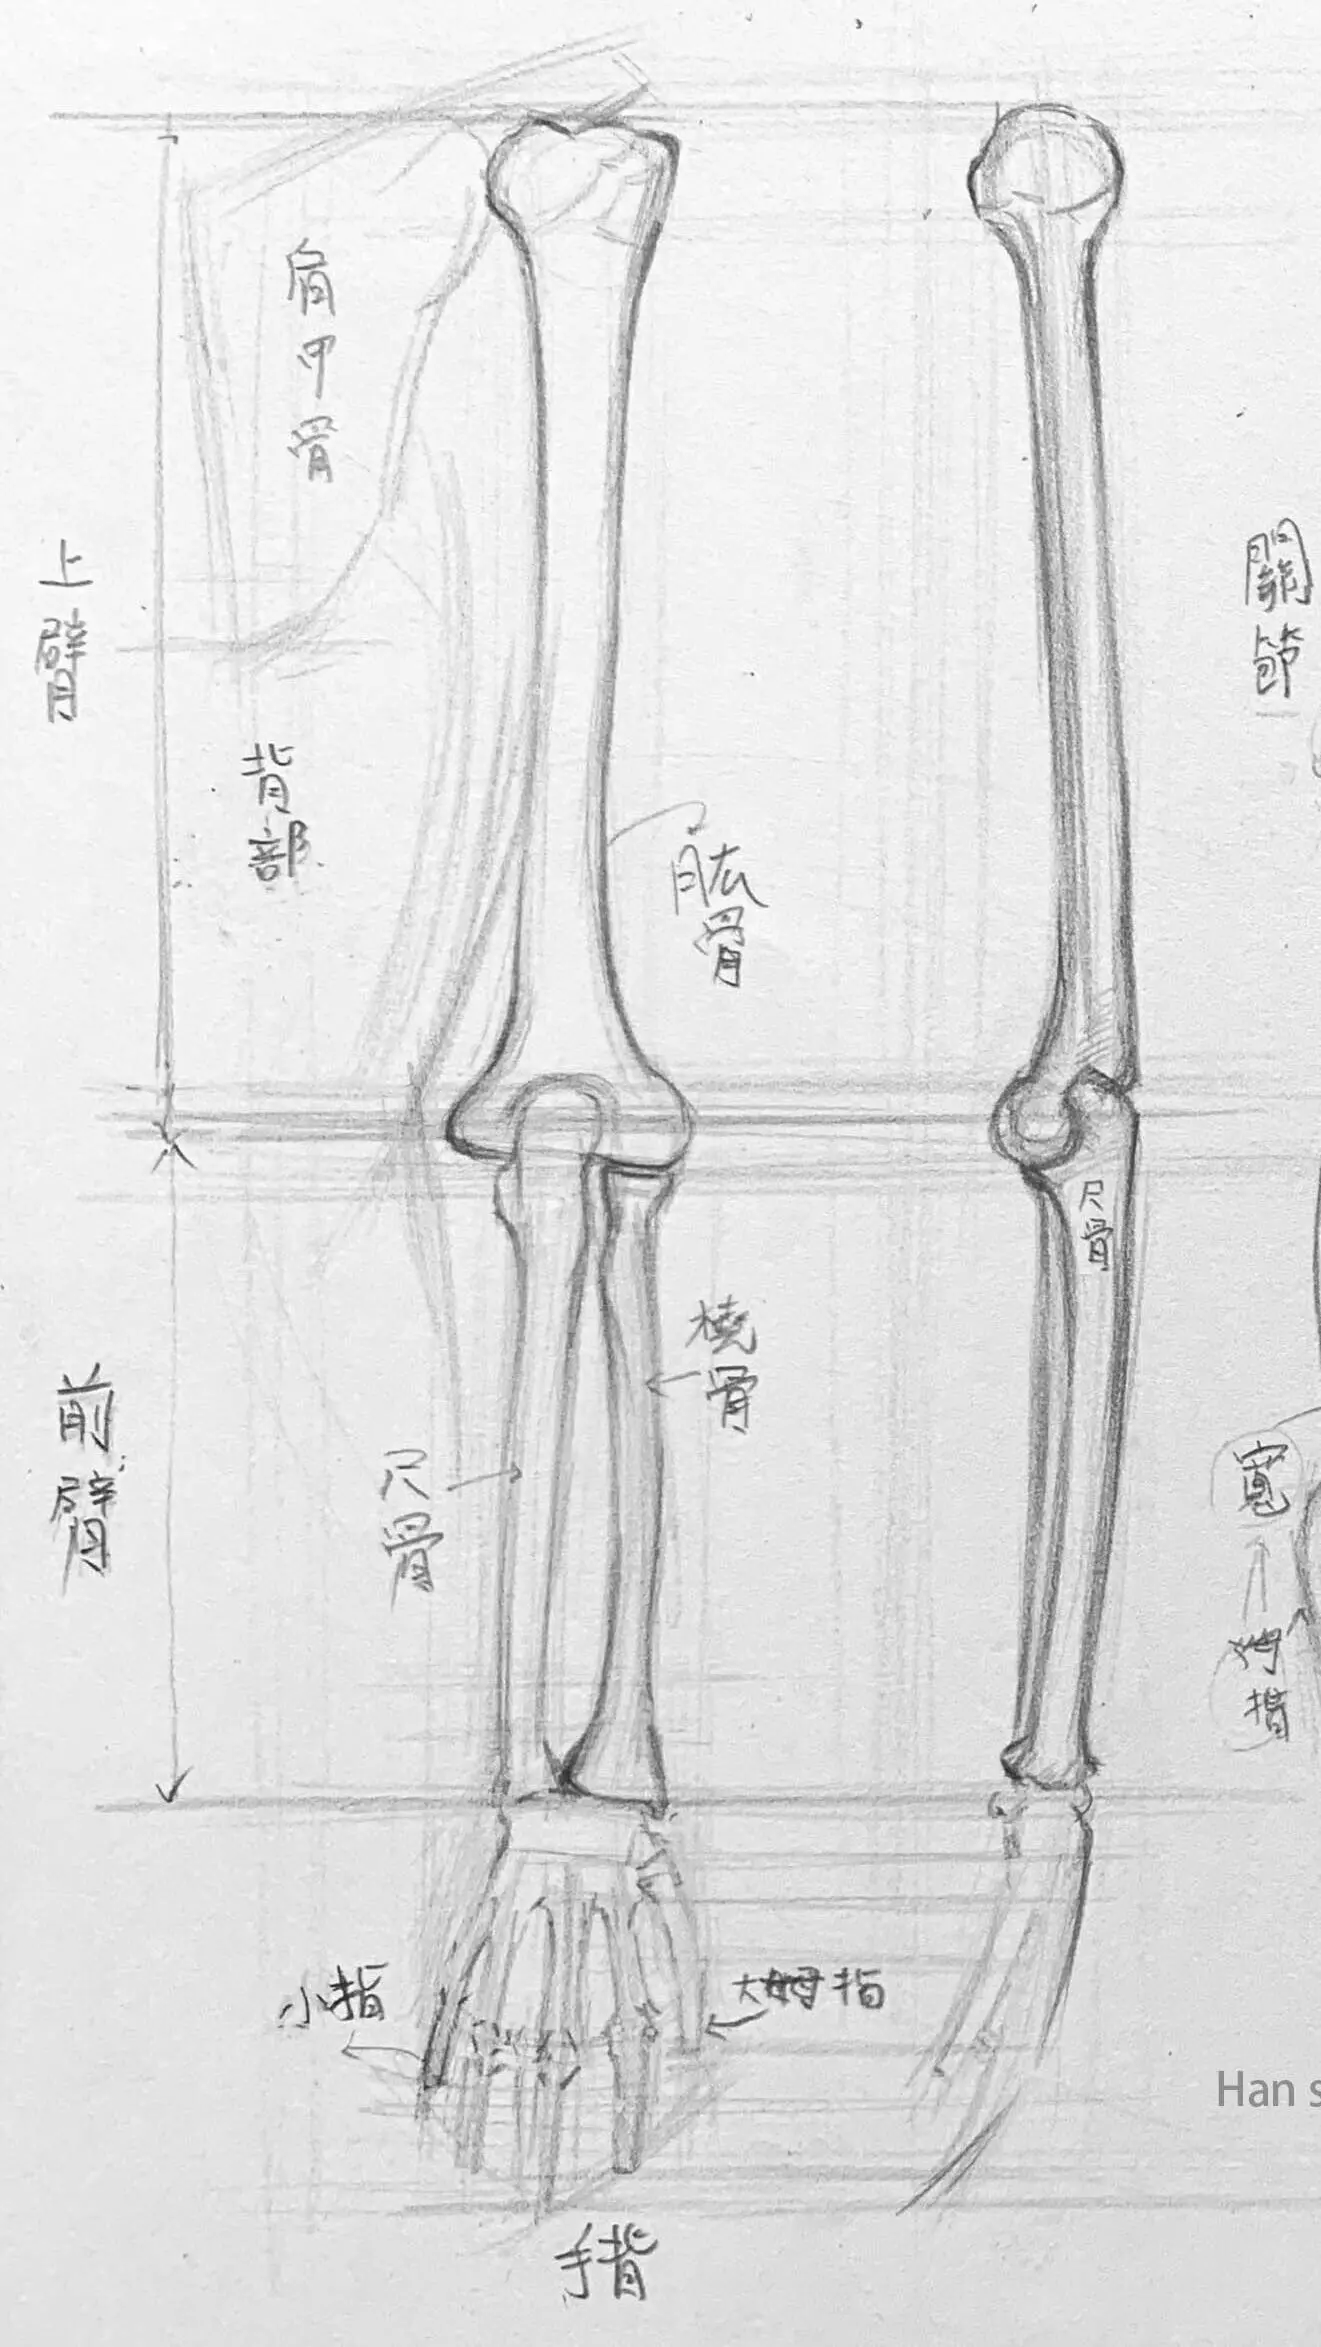
:: Upper arm -- humerus
Position: The only bone in the upper arm that connects the shoulder joint to the elbow joint.
Special Characteristics: The upper spherical portion connects to the shoulder and the lower portion connects to radius and ulna to form the elbow joint.
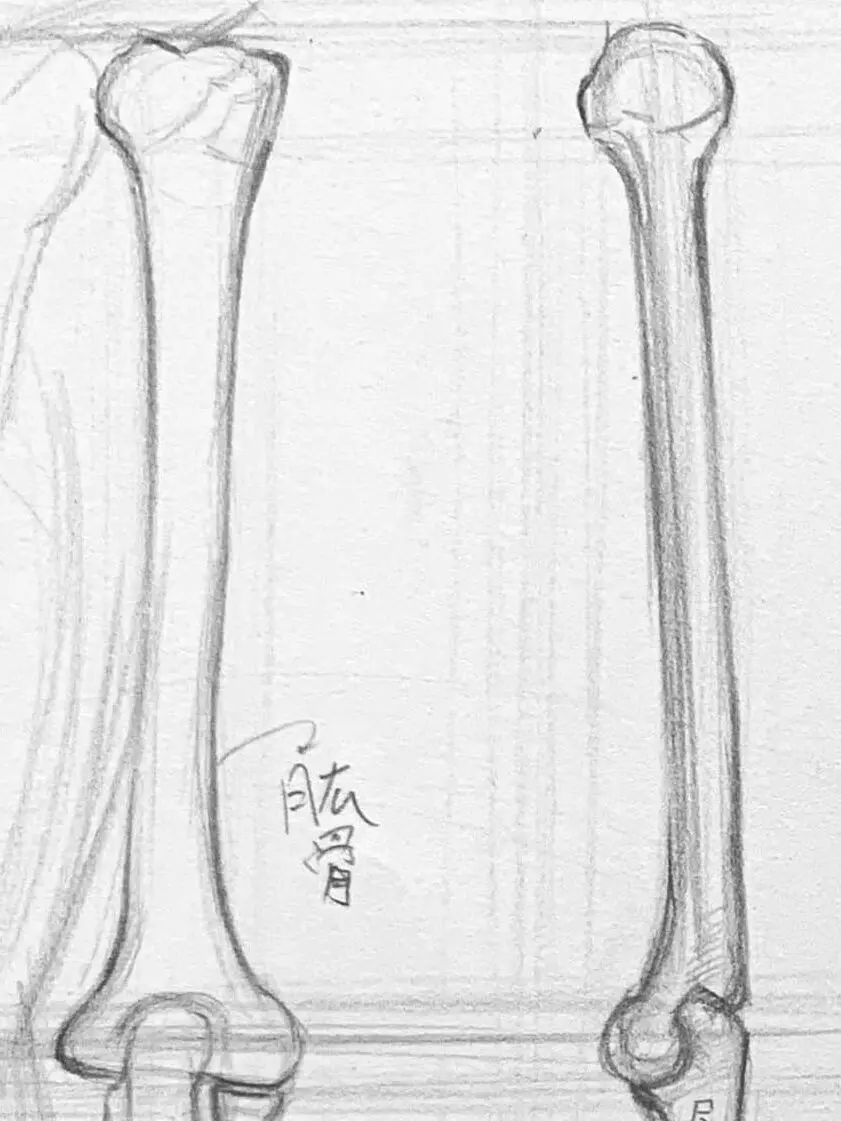
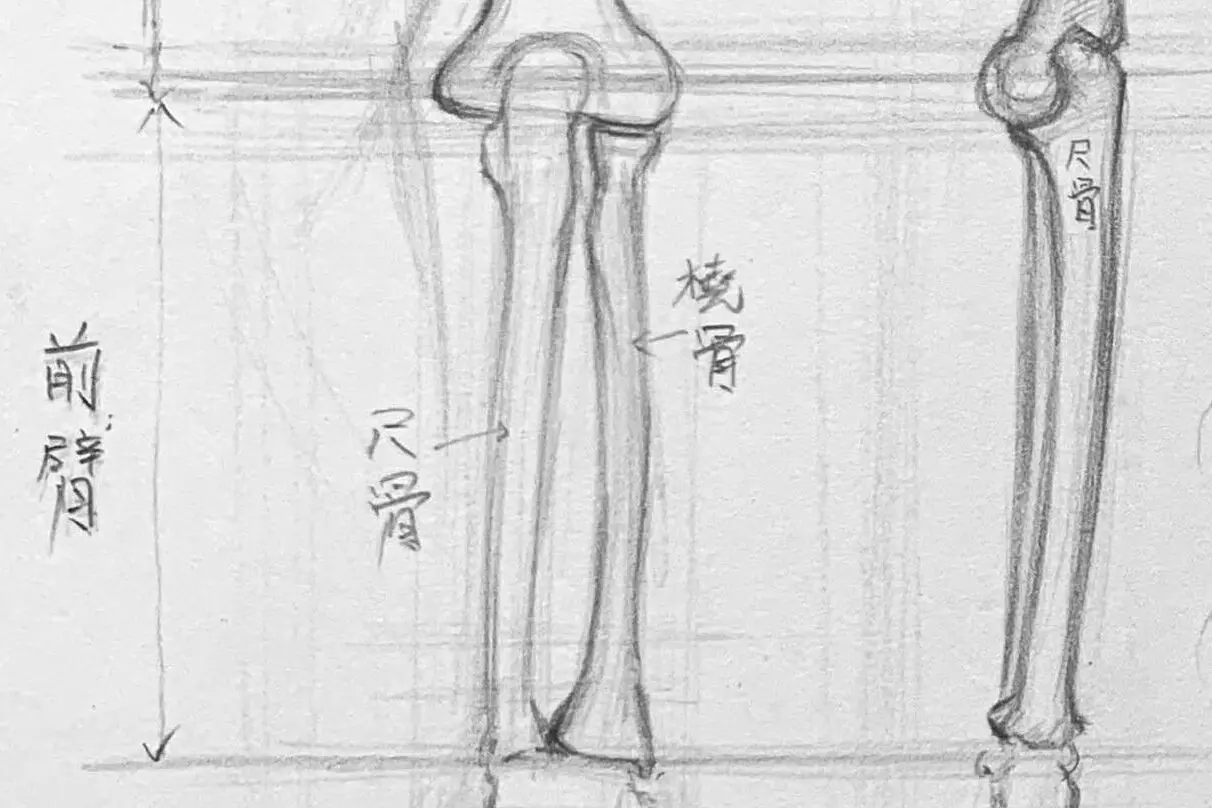
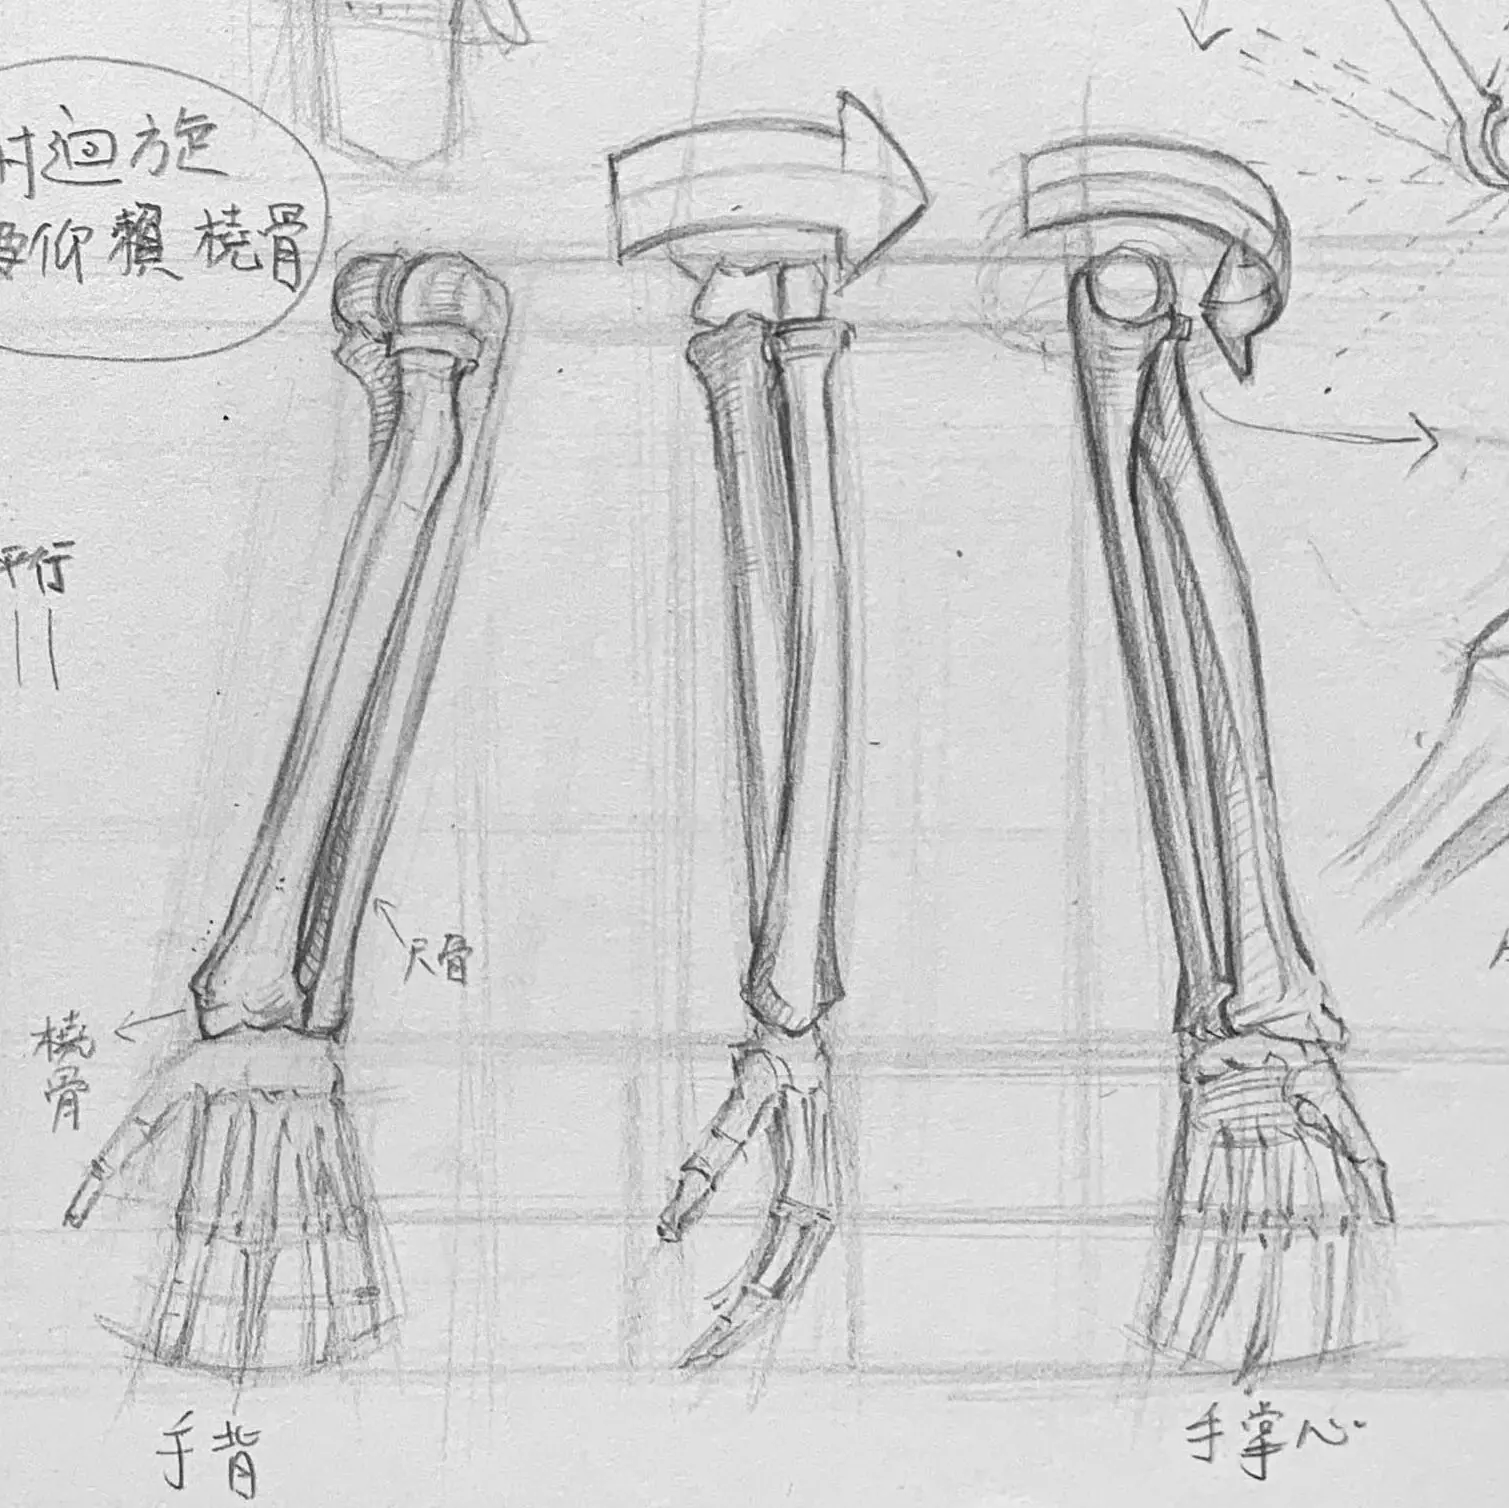
Forearm - radius, ulna
It is responsible for supporting our arms and rotational movements.
radius:
It is located on the side of the thumb, with the upper end (near the elbow joint) smaller and in contact with the lower end of the humerus; the lower end (near the palm of the hand) is wider and forms the carpal joint.
Function:Responsible for the movement of the forearm during rotation (forward and backward).
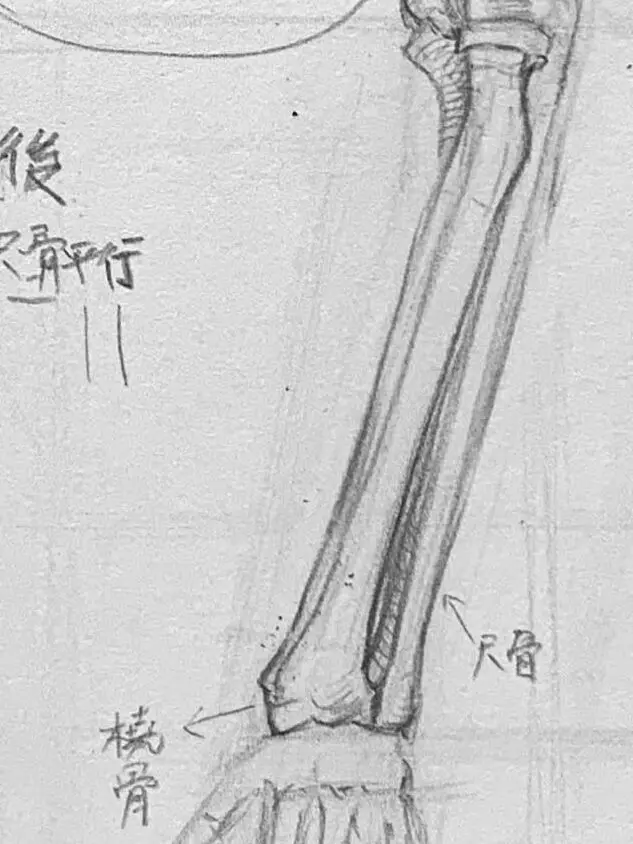
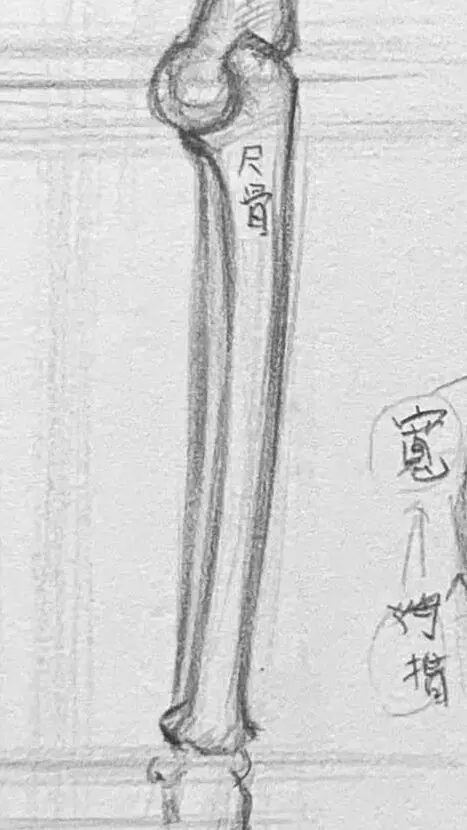
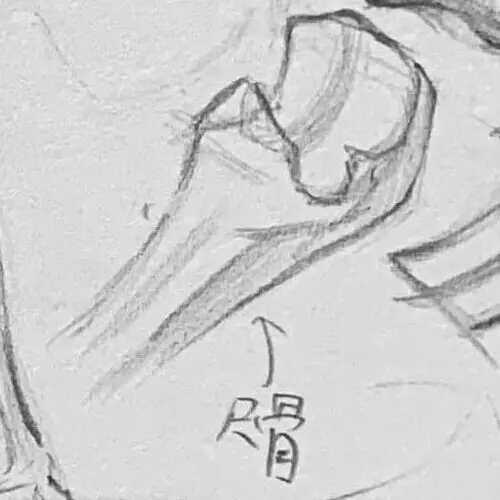
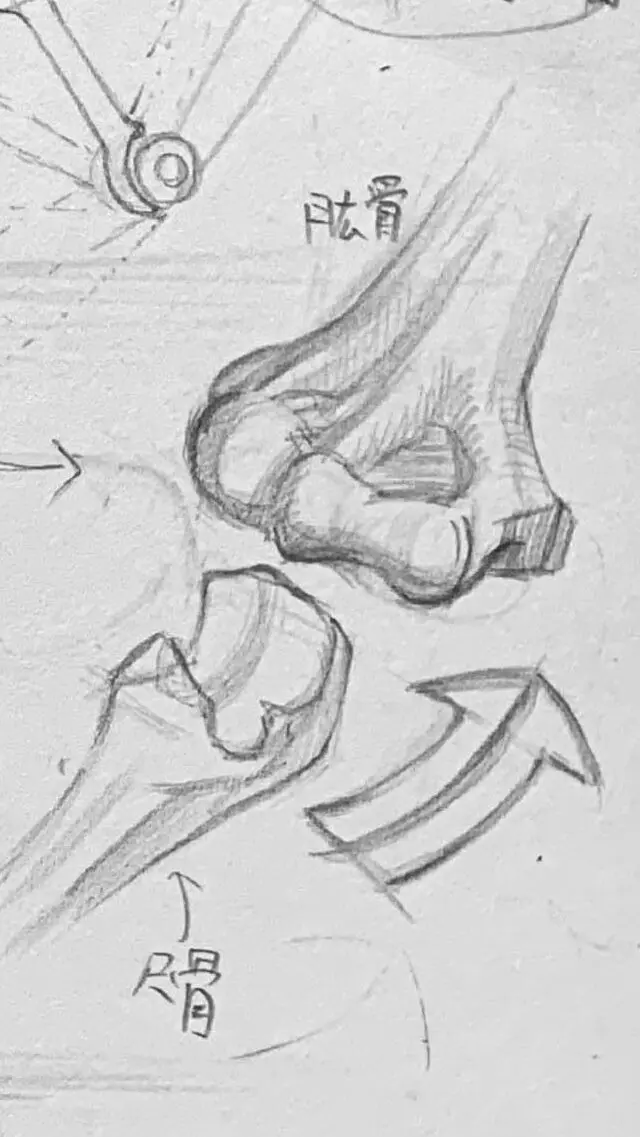
● Ulna:
It is located on the side of the little finger. The upper end has an eagle's beak protrusion that forms a protruding part of the elbow. Function:Provides stability and is the main supporting bone of the elbow joint.
The beak is shaped like an eagle's beak.
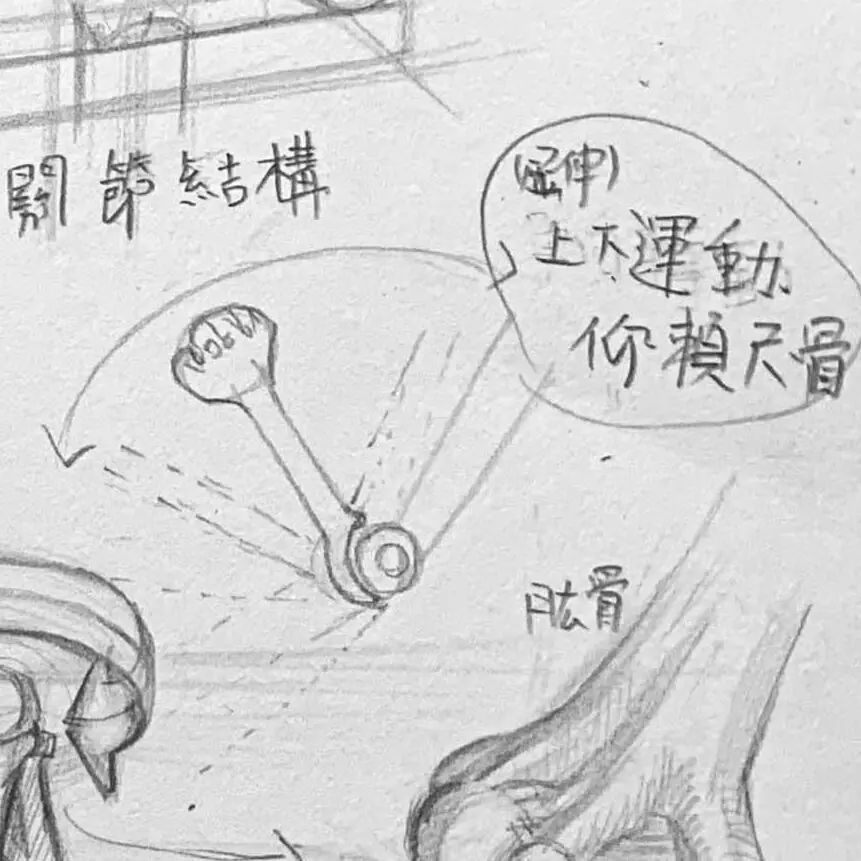
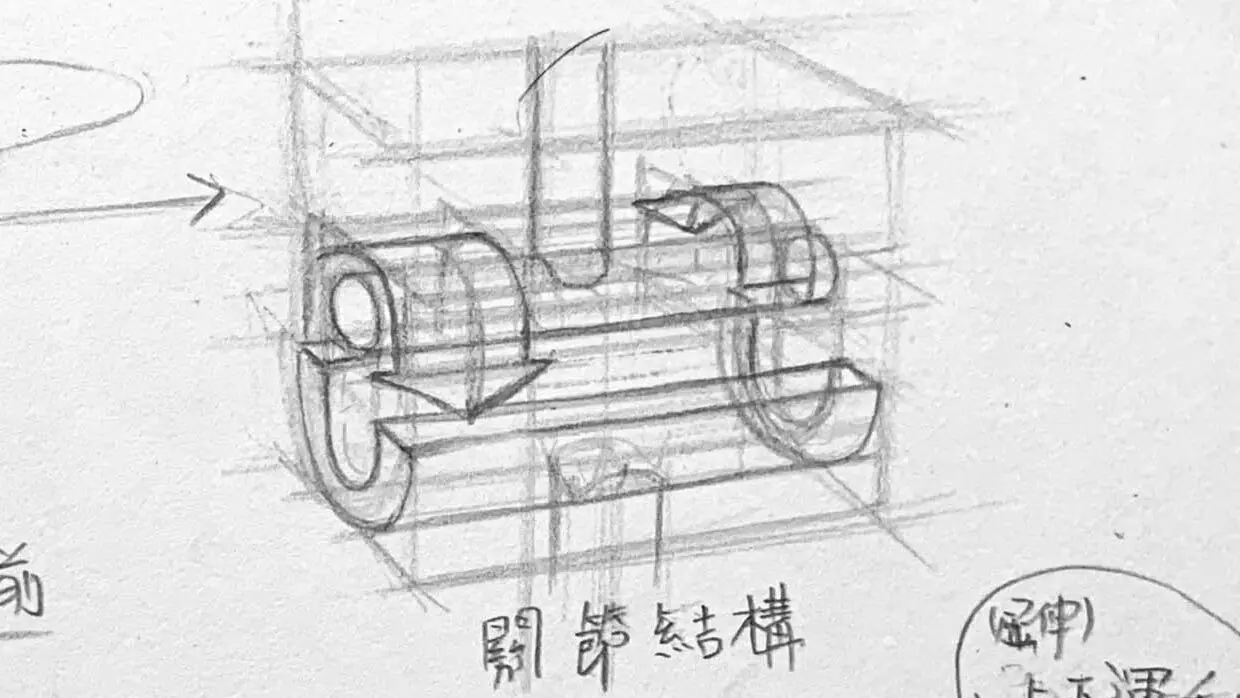
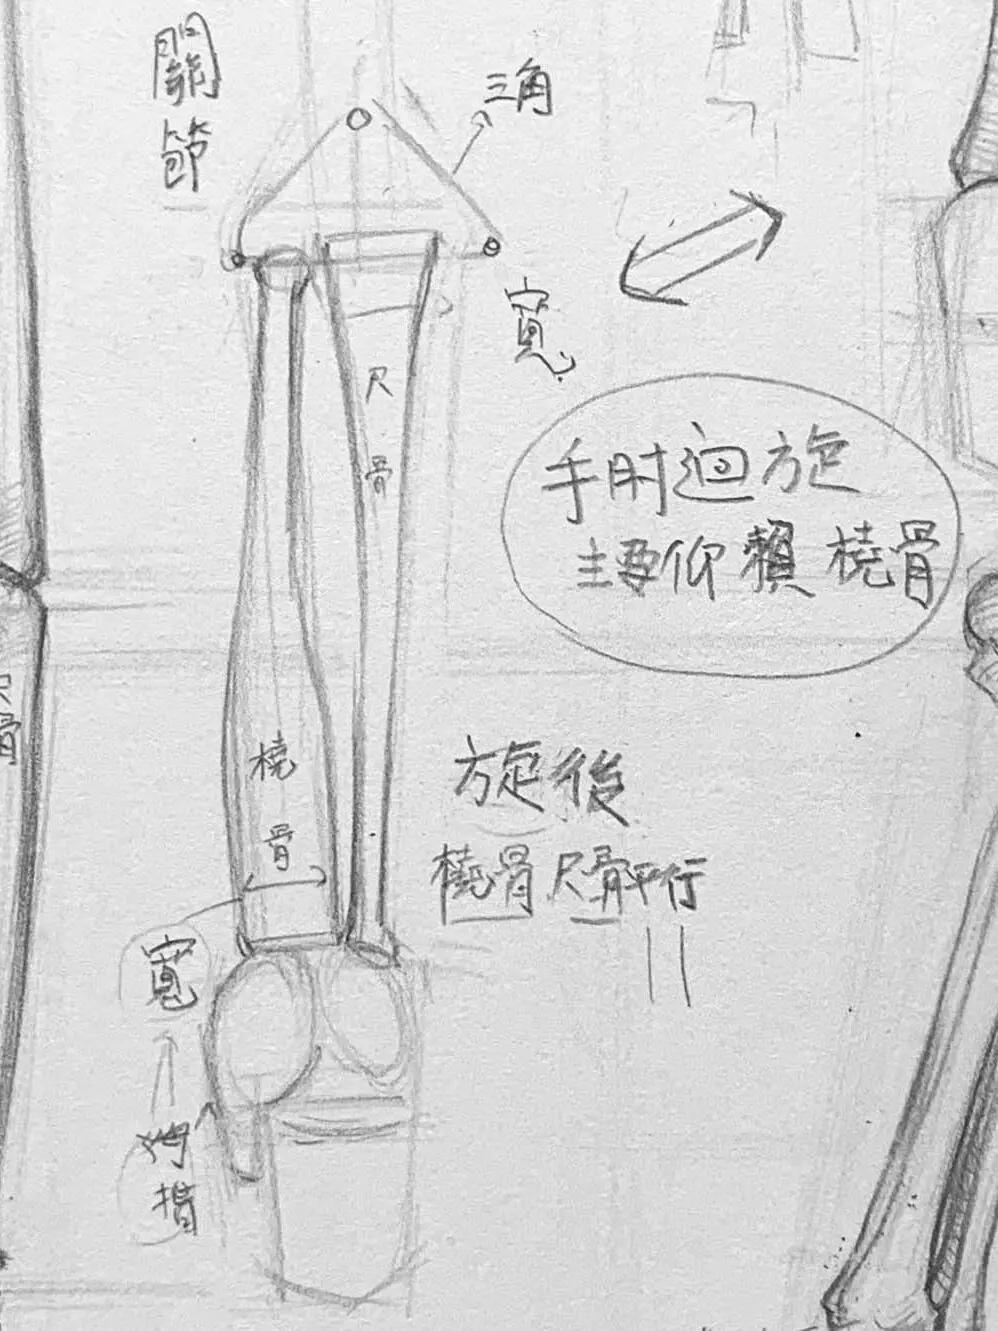
2. Joint and arm movement mechanism
● The elbow joint, consisting of the humerus, radius, and ulna.
Our arm movements can be categorized into: bending, straightening, and rotating.
In our daily life, we often use upper arm rotation movements, such as writing, cycling, keyboarding, etc., so what parts of the body help us to complete the movement?
● Arm bone movement characteristics:
1. Flexion and extension: centered on the elbow joint, with the ulna stabilizing and radius providing mobility.
Elbow joints It is a hinge-type joint that is mainly responsible for the movement of the forearm in relation to the upper arm.flexure和straighten。
flexure : The elbow joint reduces the angle between the humerus and the forearm when the forearm is bent upward, such as in lifting a heavy object or picking up something.
straighten : When the forearm is straight down, the elbow joint opens to form a nearly straight arm position, such as pushing a wall.
The small picture below shows the movement of our elbow joint, which is shaped like a C-slot.
The way our elbows flex and extend is similar to the way the following column rotates in the slot.
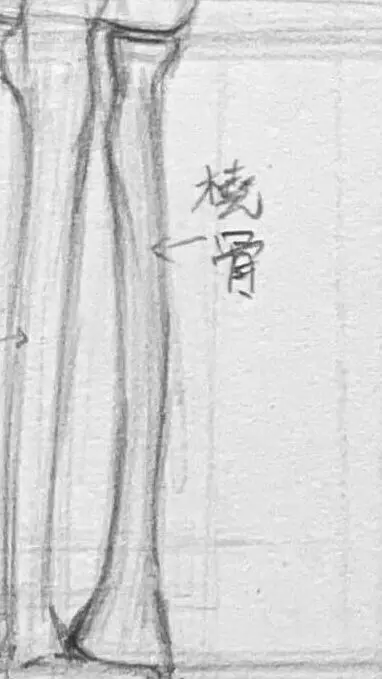
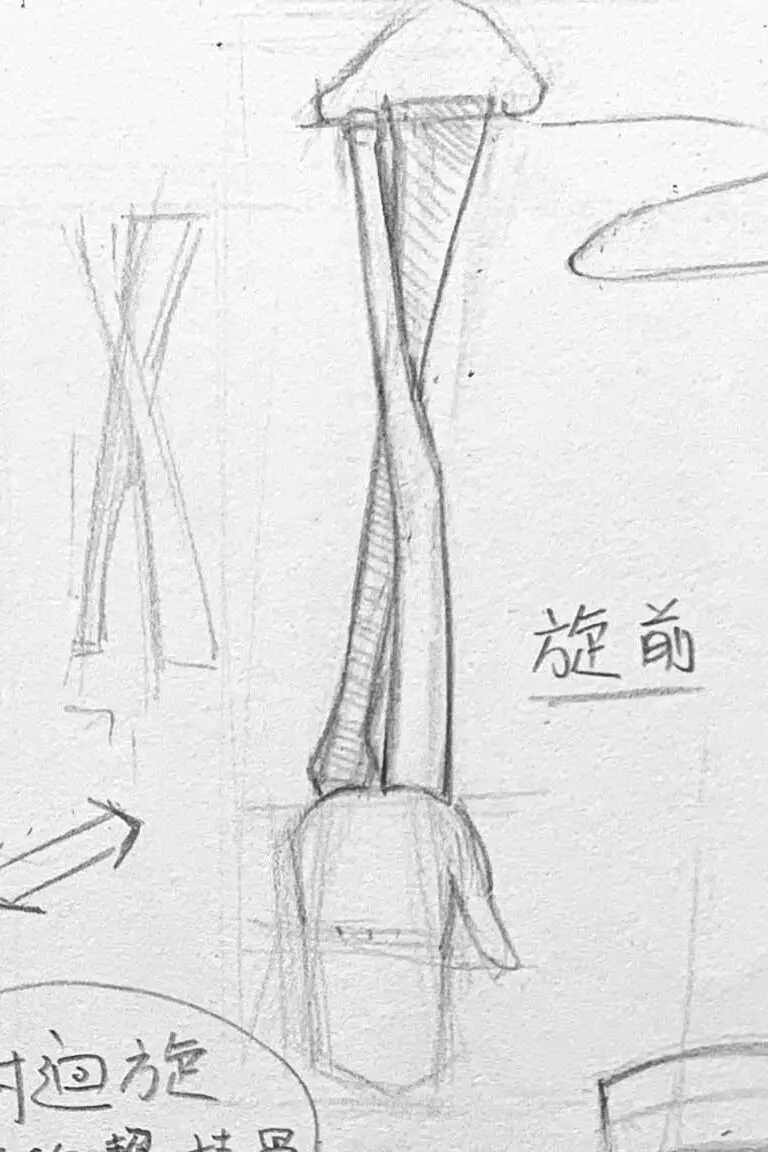
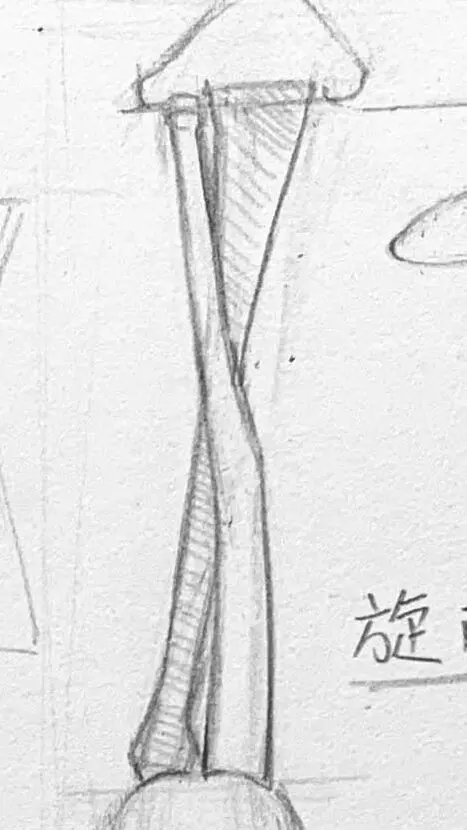
2. Anterior and posterior rotation: radius rotates around the ulna and bends to resemble an X shape.
orbit the front of a machine : When the palm faces down, radius rotates and crosses over the ulna with the palm facing down. For example, when you place your palm on a tabletop, it is rotated forward.
after a short time : When the palm is facing up, radius and ulna are parallel, which allows the palm to face up. For example, when you open your palm to pick up something, it is rotated back.
3. Skeletal shape simplification method.
To make it easier to understand shape features, bones can be simplified to geometries. Please refer to the middle diagram for a simplified shape.
● Humerus:
It resembles a column with variations in thickness, slightly wider at the ends and gradually narrowing in the center.
radius and ulna:
Note that radius is larger at the wrist and ulna is wider at the elbow.
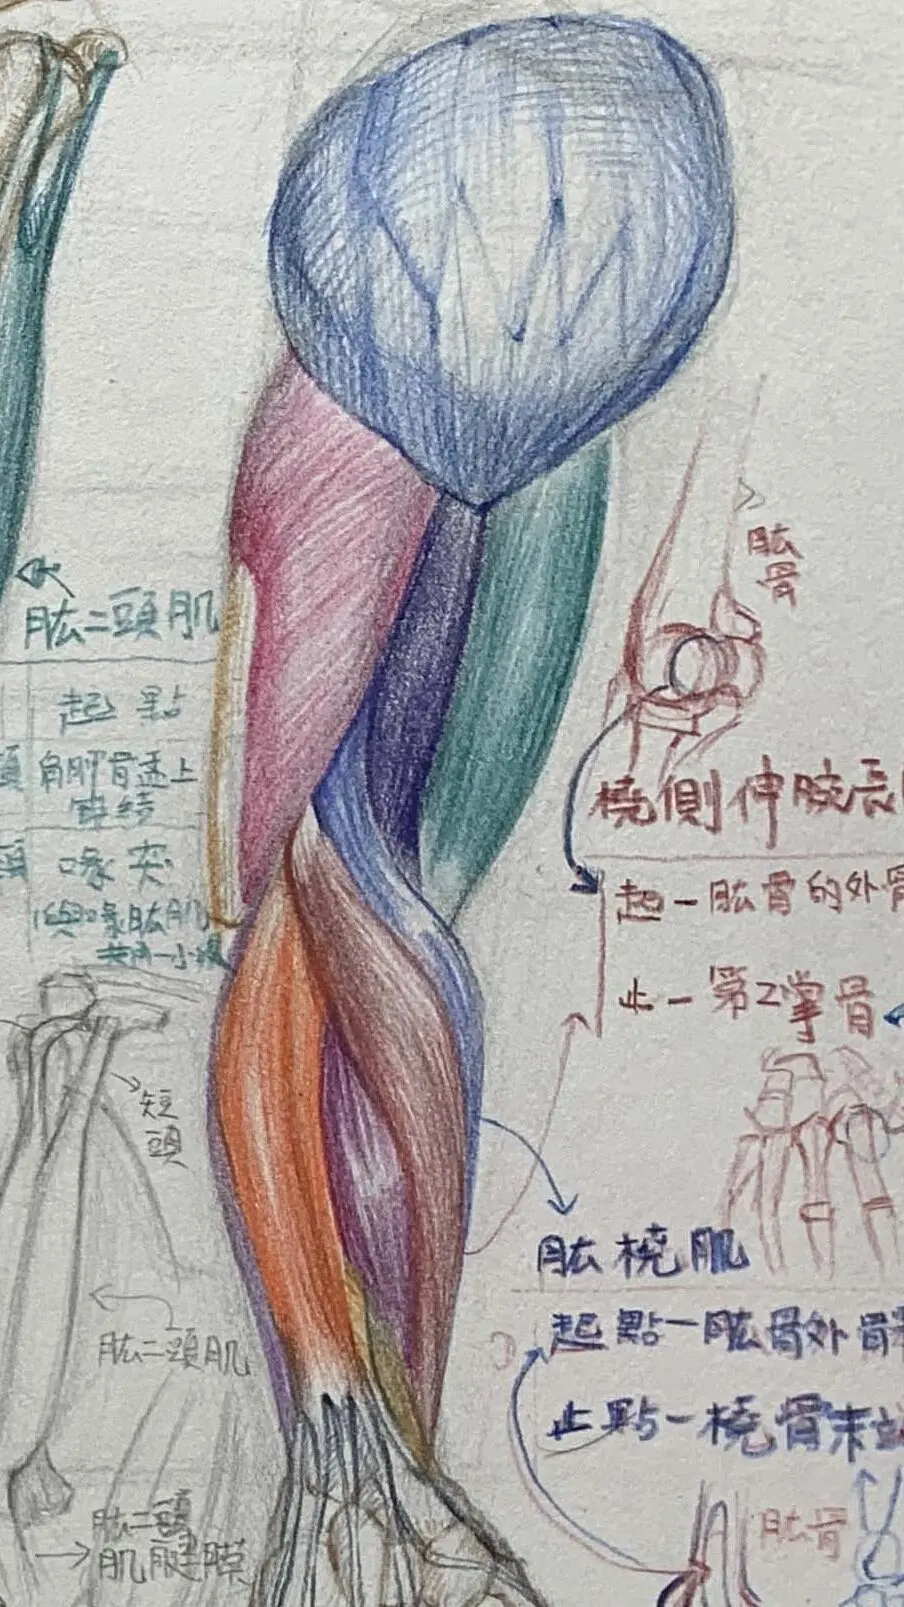
Recognize the major muscle areas of the arm
First, let's take a look at a few of the important muscles in the arm that influence the shape and strength of the arm:
Let's create"Skeletal -> Muscle -> Motion."The order of understanding, from the underlying structure to understand, and then want to draw the action is easier to understand how the muscles turn and change.
Any muscle must 'start' at a bone and 'stop' at another bone.
Therefore, it is important to know the location of the bones first, for example: you need to know where the humerus is in order to understand where the biceps and triceps are pulling and how they are stretching.
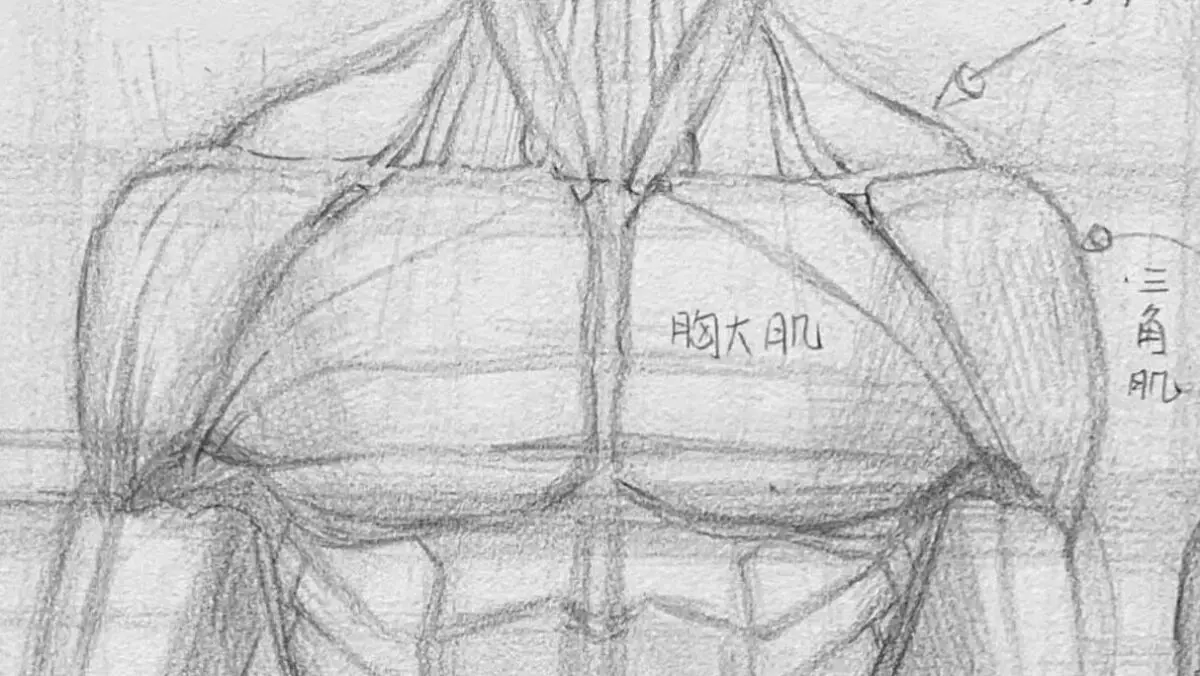
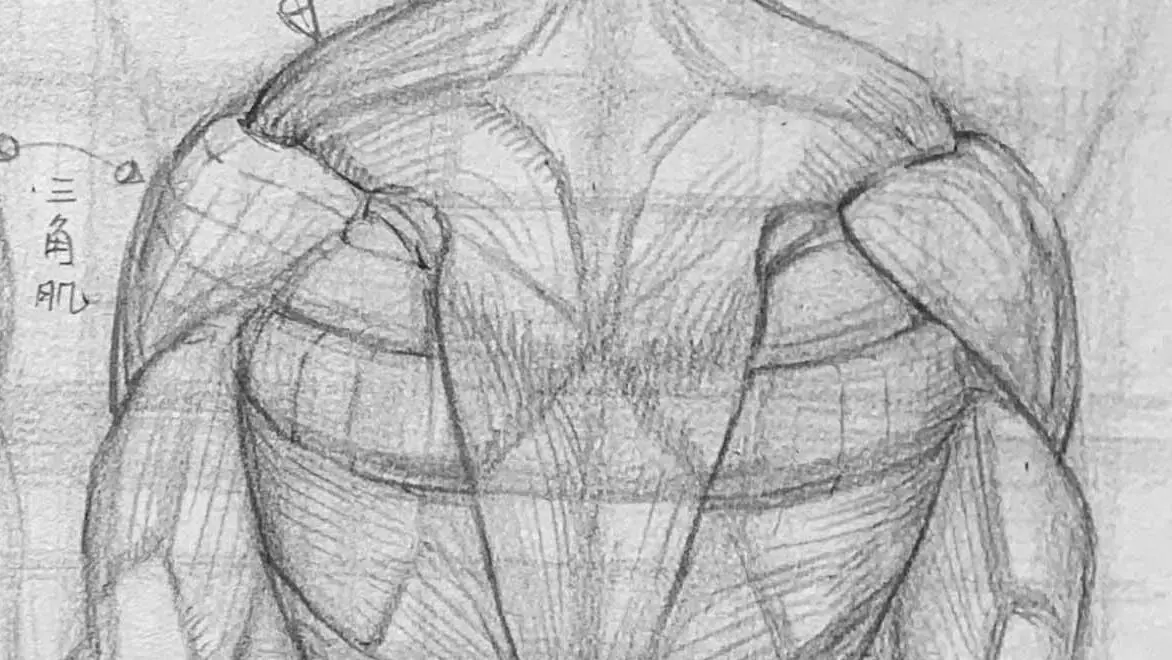
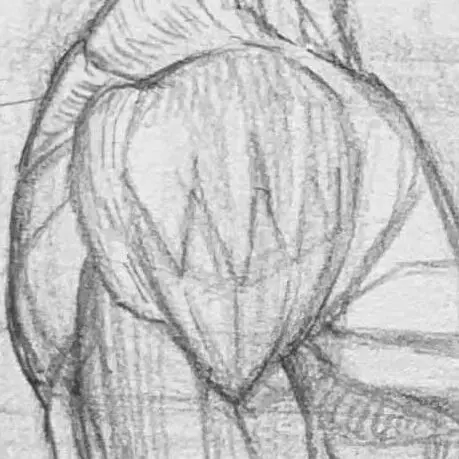
Shoulder and Lateral Upper Arm Muscle Groups
deltoid muscle (over the shoulder):
The overall shape of the shoulder is made up of the deltoid muscle, which is like an inverted teardrop or trapezoidal cap, located above the shoulder, and is the main part that determines the roundness and muscularity of the shoulder.
Starting point: lateral end of clavicle, acromion, scapular spine
stop: Mid-lateral humerus (deltoid ramus)
Demonstration: The blue mesh area on the far right represents the shape of the deltoid wrap.
functionalityLift your arm, and the entire deltoid muscle acts as a “bridge” across your shoulder and the outside of your upper arm.
From the front, the groove line between the anterior fascia and the pectoralis major muscle is clearly visibleBackside view of the deltoids
The deltoid muscle is divided into anterior, middle and posterior fascicles.
front beam: Start at the anterior part of the lateral clavicle and manage the forward arm lift.
center beam: Starts at the lateral aspect of the acromion and is responsible for the abduction of the arm.
back bundle (of electrons in vacuum tube): Starts at the scapular spine of the shoulder blade and helps to extend the arm back.
When viewed from the side, the deltoid muscle is thickest at the middle fascicle and forms a distinctly rounded surface.
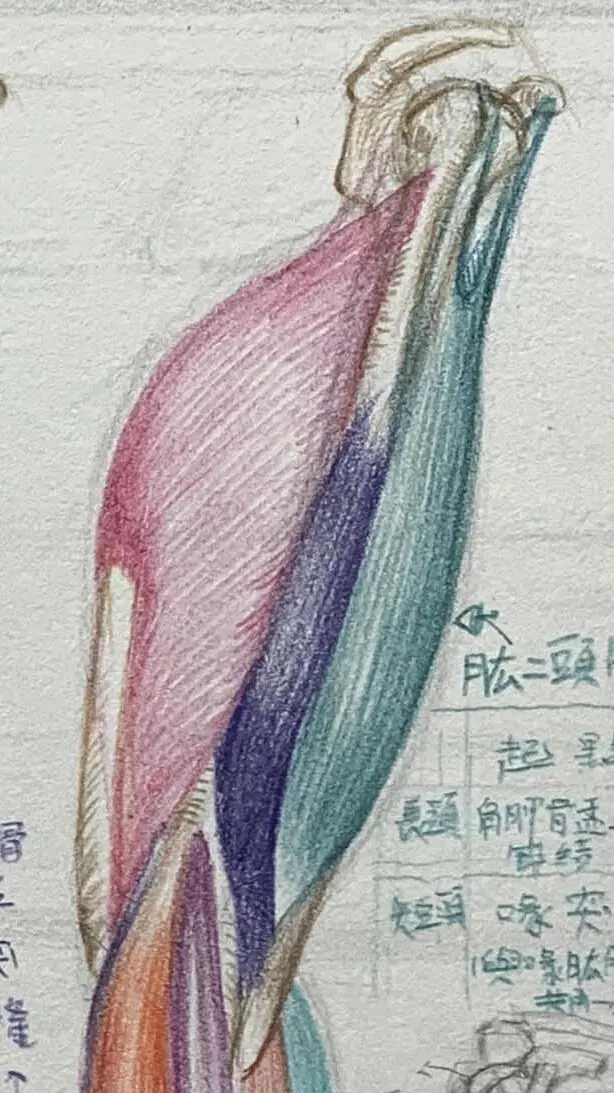
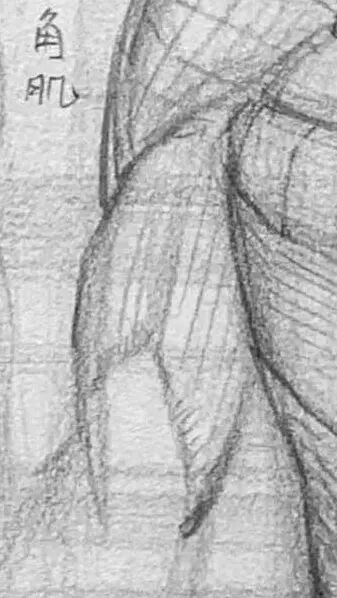
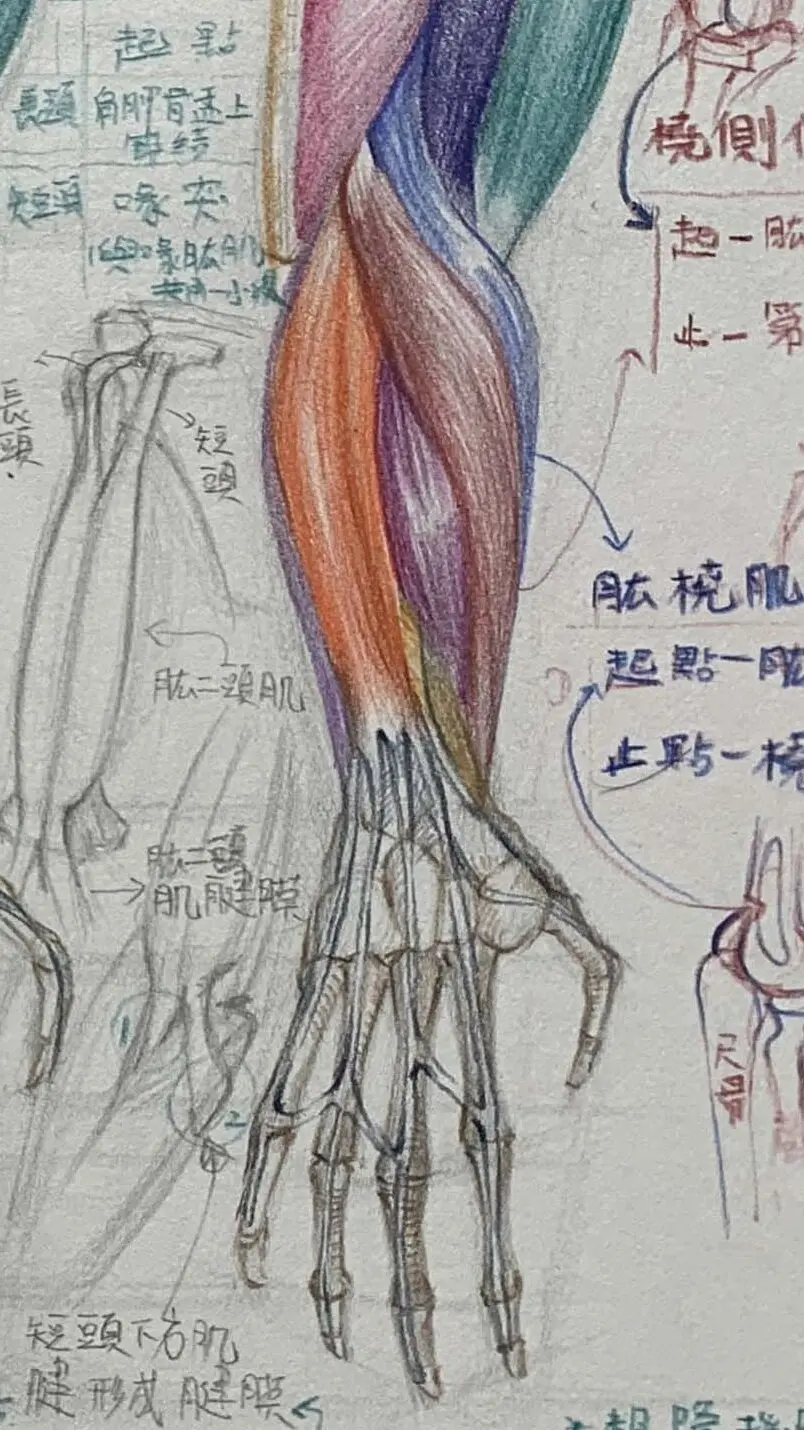
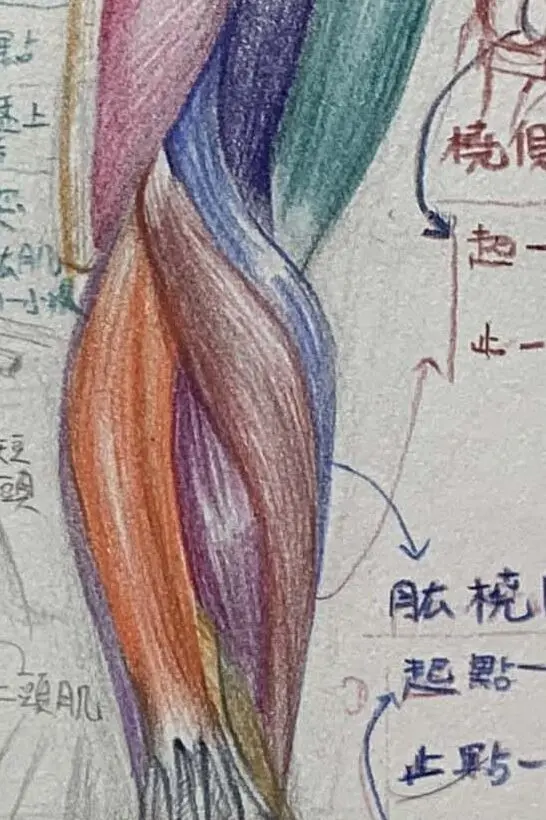
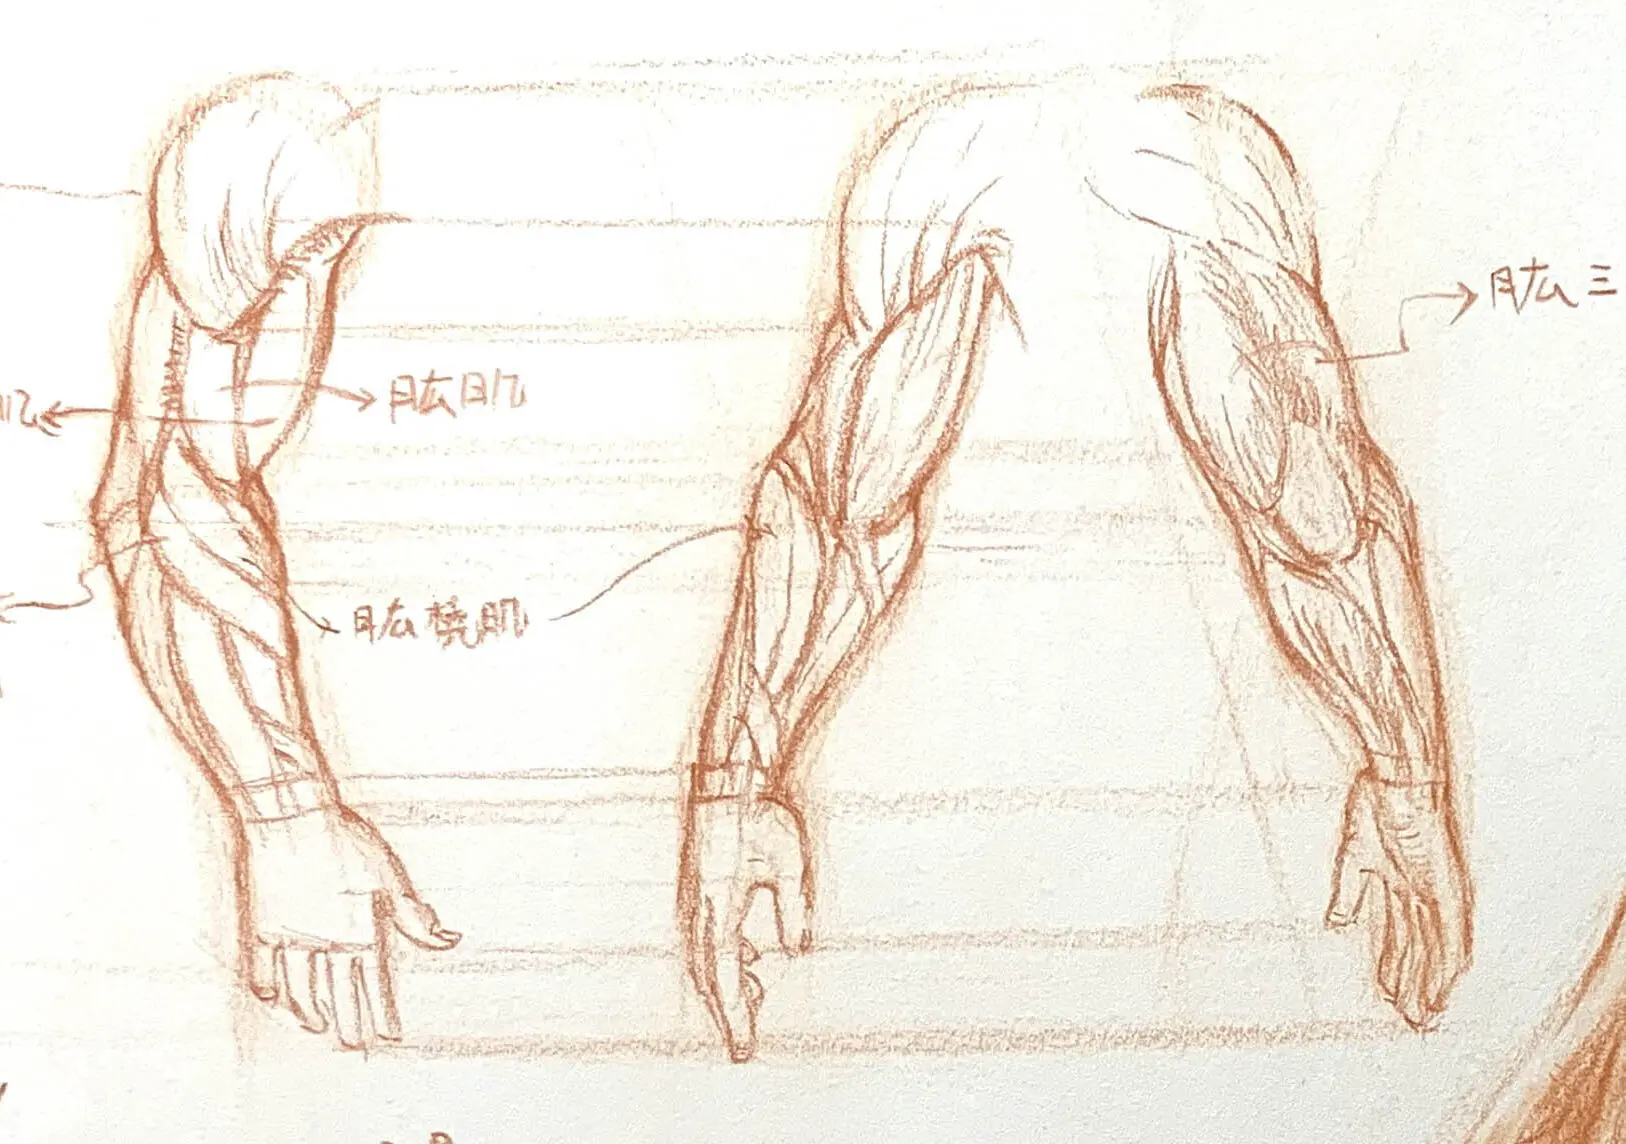
Upper arm (Biceps group(with associated muscles).
The upper arm muscles are roughly divided into anterior lateral flexors (biceps and brachialis) and posterior extensors (triceps). The appearance of the muscles changes dramatically with arm movements (elbow flexion, extension).
Biceps and triceps changes from the back.
brachialis muscle (back of the upper arm):
Position and shape:
hidden inUnder the bicepsIt is one of the main muscles of forearm bending, extending from the mid humerus toward the ulnar tuberosity.
Flat in appearance, with some slight contouring below the biceps.
visionspecial featureThe point:
The contour line of the brachialis muscle protrudes slightly from the edge of the biceps muscle, especially in a lateral view of the upper arm.
Starting point: Lower middle part of the anterior side of the humerus
stop: ulnar tuberosity
Demonstration: The brachialis is a purple-blue area between the biceps (blue-green) and triceps (peach).
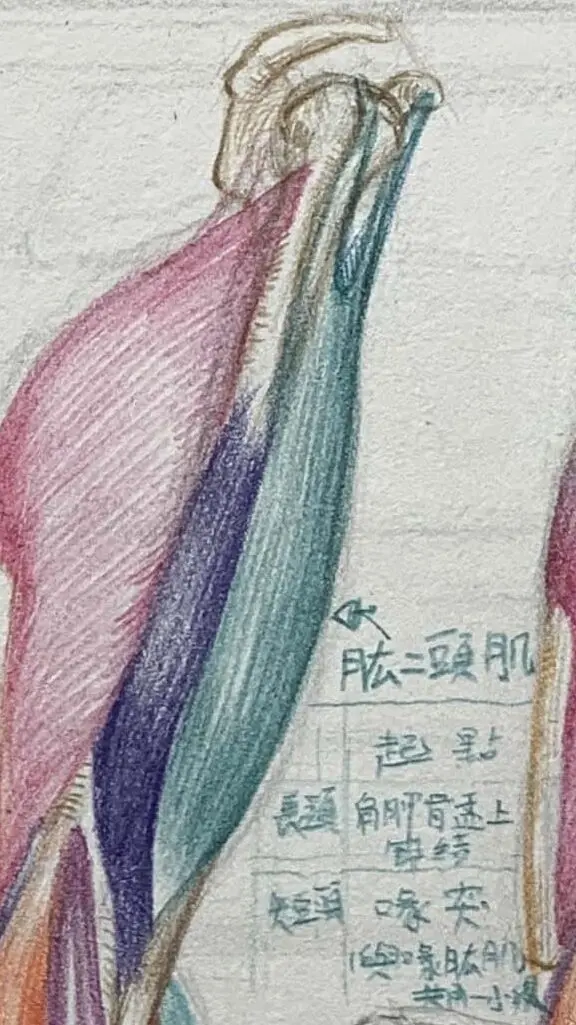
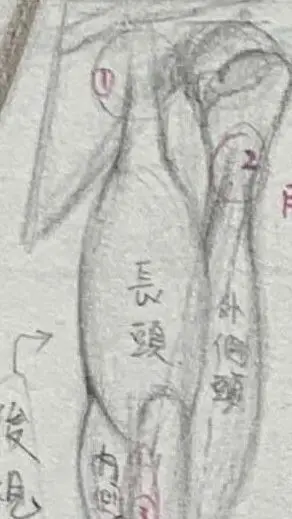
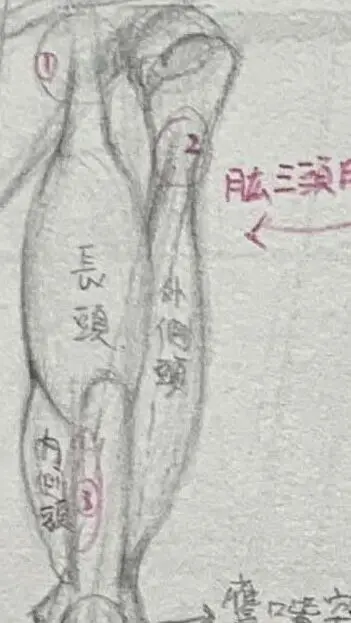
Biceps position and shape:
The most obvious muscle in the forearm when it is flexed, showing an elliptical shape of fullness.
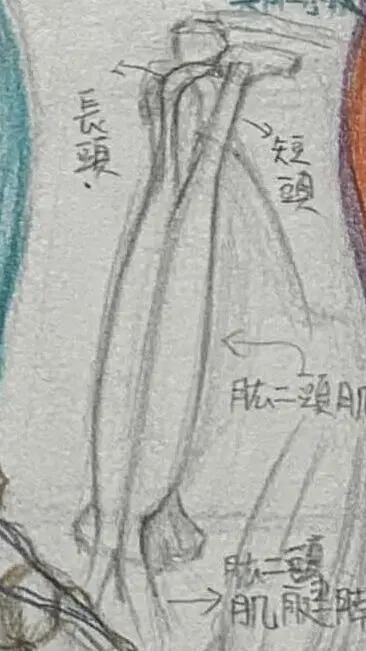
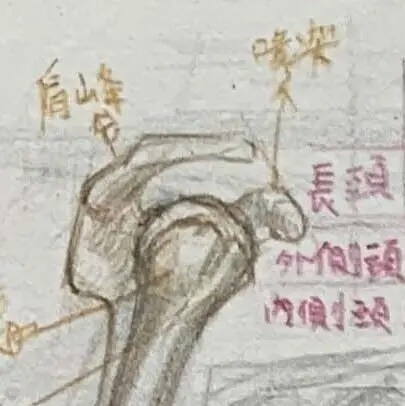
There are two heads (long and short) that begin at different points on the scapulae, creating a "double head" feature that terminates at the radius ramus (lateral side below the elbow).
Biceps long head:
Starting point: Supraglenoid tubercle of the superior border of the glenoid of the scapula
stop: radius profundus and elbow tendon tendon membrane
Demonstration: reddish (peachy) fat-like mass → most obvious in both heads in the “long head” position outermost.
Biceps short head:
Starting pointThe rostral process is a small, curved bony protuberance located on the anterior side of the scapula.
stopradius and long head combined with muscle belly
Demonstration: blue-green, biceps builds over the brachialis (purple-blue) muscle
biceps : Located on the front side of the arm, this muscle becomes especially visible when you bend your arm.
triceps brachii (back of the upper arm) : Located on the back side of the arm, it is responsible for straightening the arm.
forearm muscle group: These muscles allow the arm to be more flexible when turning and moving.
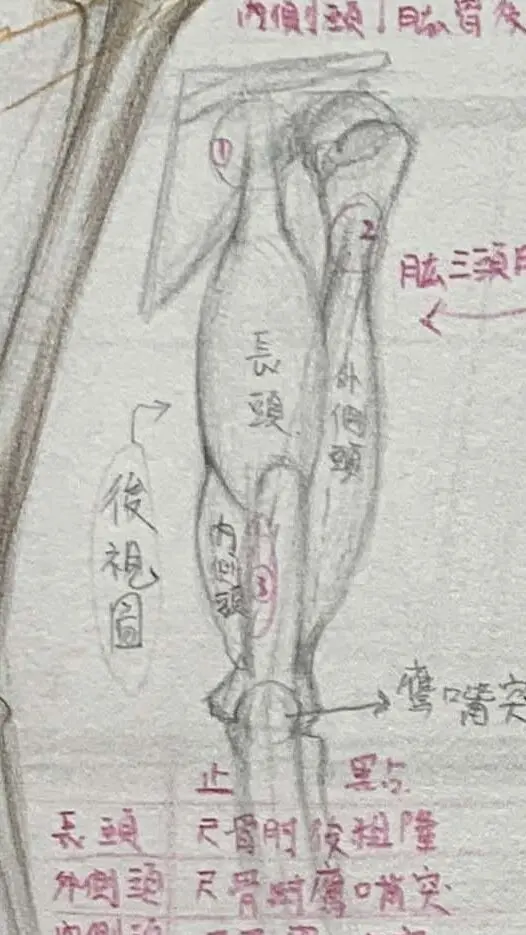
Triceps group (back side of upper arm, peach-colored area)
Position and shape:
Located on the back side of the arm, it is the largest muscle group at the back of the upper arm.
It has three heads (long, lateral, and medial), which are longer and wider in shape and are responsible for arm extension movements.
Visual Characteristics Highlights:
The muscles are more relaxed when the upper arm is straight; when the arm is stretched or braced, the muscles are visibly tense, showing a clear muscle mass contour.
Triceps long head:
Starting point: subglottic margin of the scapula
stop: Elbow extensor site of the ulna
Demonstration: A light green area that extends from the back of the shoulder blade to the elbow.
triceps brachiiOuter and Inner Heads:
Starting point: posterior lateral and medial surfaces of the humerus
stop: Same as extensor tendon of the elbow
Demonstration: Medium to dark green, tightly packed on the sides of the long head.
functionality: Straighten your elbows and push your arms back.
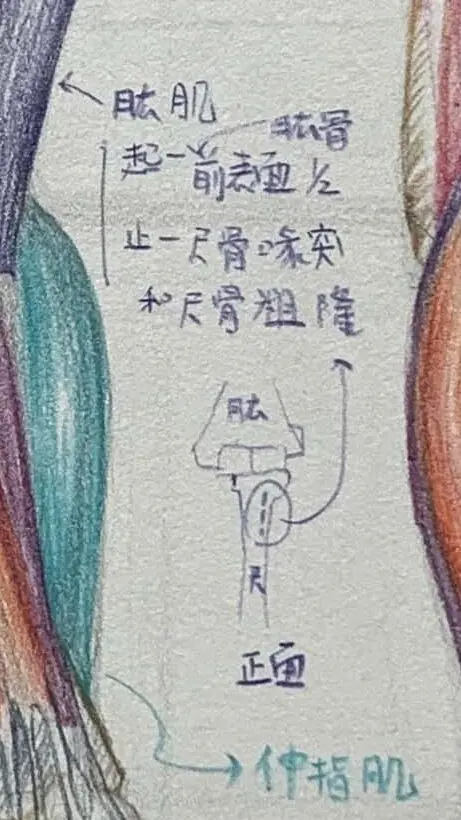
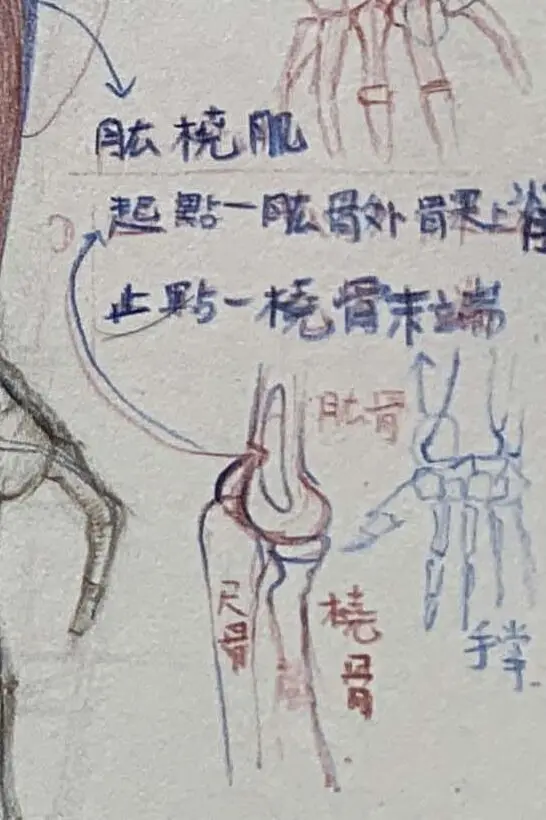
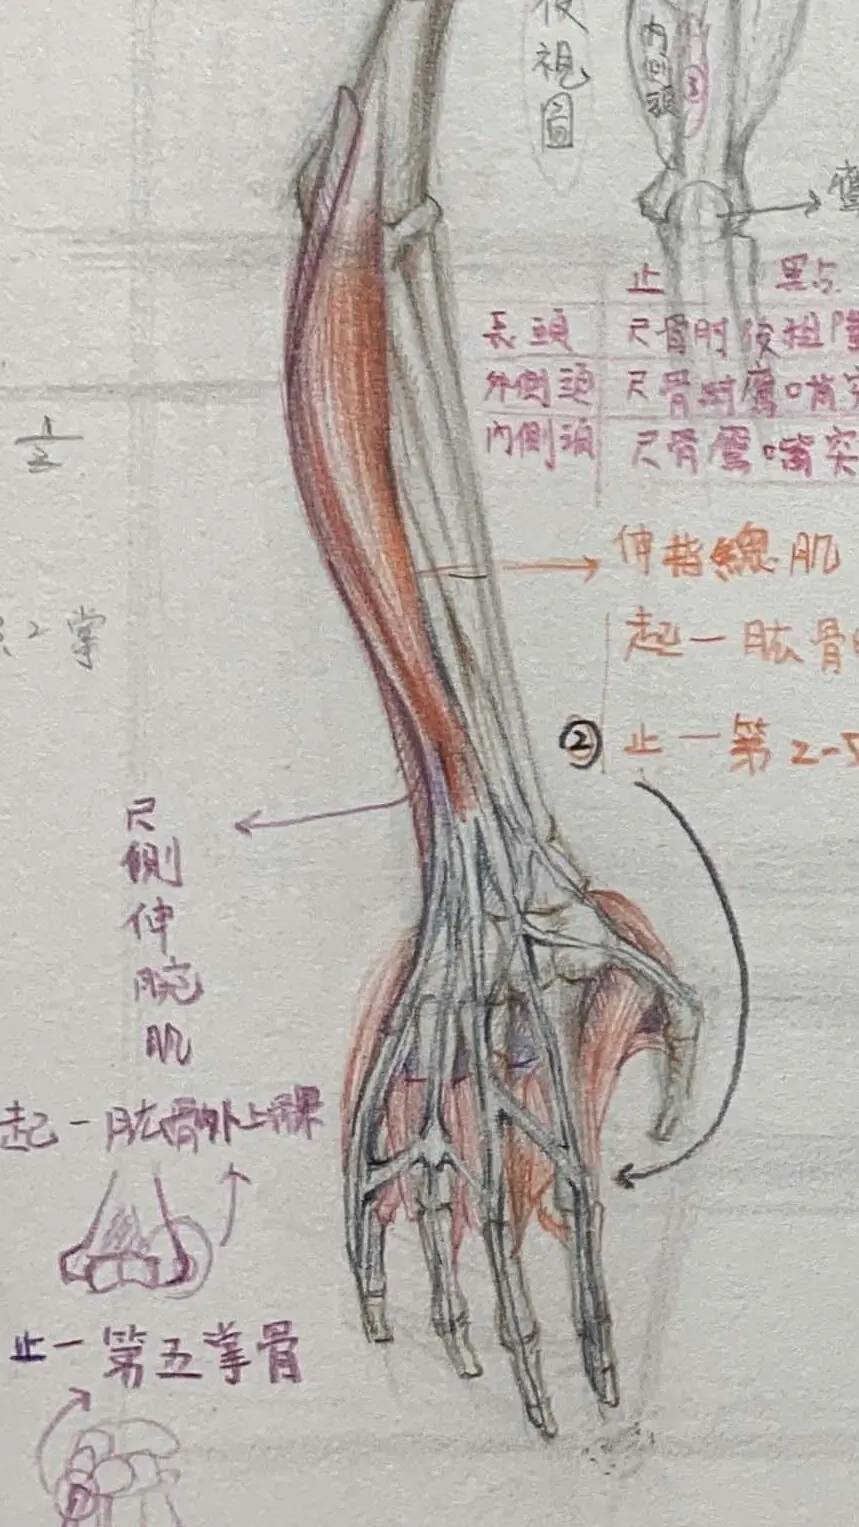
Forearm muscle group (corresponding to the ulnar radius region)
Featured Description: The muscles of the forearm are thin and densely packed, mainly controlling the delicate movements of the fingers and wrist. From the elbow joint downwards, the muscles gradually turn into long, thin tendons, which visually appear to be radially distributed.
radius humerus(light blue):
Starting point: Lateral humeral condyles
stop: radius cavernous
Demonstration: Light blue thin strip covering the outermost edge of the forearm.
functionality: Forearm rotation from semi-flexed to neutral position (with some flexion of the elbow).
wrist extensor muscle group/Extensor group of the posterior side of the forearm (dorsum of the hand) extensor digitorum longus (anatomy)
The extensor digitorum longus is a superficial fan-shaped muscle located on the dorsal aspect of the forearm, extending from the elbow to the dorsum of the hand, and ultimately dividing into four tendons, each extending the 2nd to 5th fingers.
Starting point: Shares a "common extensor tendon" with other superficial extensor muscles (e.g., extensor digiti minimi, ulnar extensor carpi radialis brevis), which is attached to the posterior aspect of the lateral epicondyle of the humerus.white tendon membraneUp.
stopThe muscle travels to the wrist joint and splits into four tendon filaments that pass through the back of the hand; after reaching the backs of the fingers, it is woven into the tendon membrane of the extensor muscles of each finger, which is also known as the "tendon filament".extensor tendon membrane」
Demonstration: The smaller, iris-shaped, orange-red area that extends from the elbow to the wrist to the metacarpal bone marks the course of each tendon.
Palmaris longus/wrist flexors:
Demonstration: The smaller, iris-shaped, orange-red area that extends from the elbow to the wrist to the metacarpal bone marks the course of each tendon.
Starting point: Mostly in the medial epicondyle of the humerus
stop: Wrist with palmar tendon (palmar tendon plate), 2nd to 5th metacarpals
Explanation of arm bone and muscle coordination
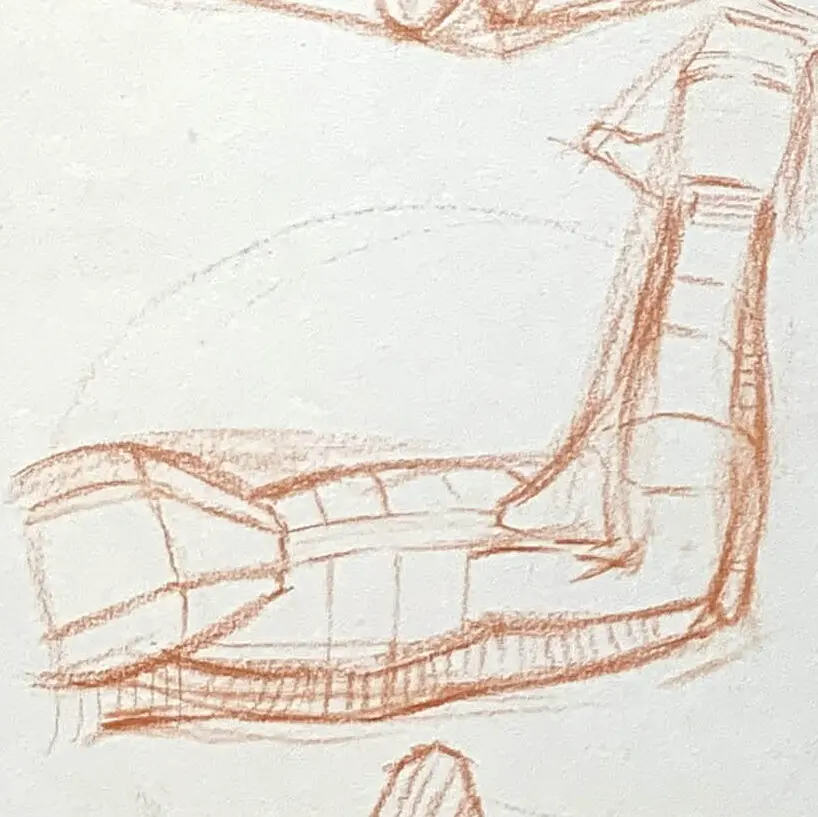
Skeletal positioning + simplified skeleton
The coffee-colored lines on the right illustrate the lateral scapula and humerus, while the anterior and posterior relationships of the ulna and radius are shown on the left.
The purpose of drawing the bones is to allow us to establish that the bones are the basis for the attachment of the muscles, and skipping the bones and drawing the muscles directly may result in the muscles running out of position too much.
How do you draw an arm?
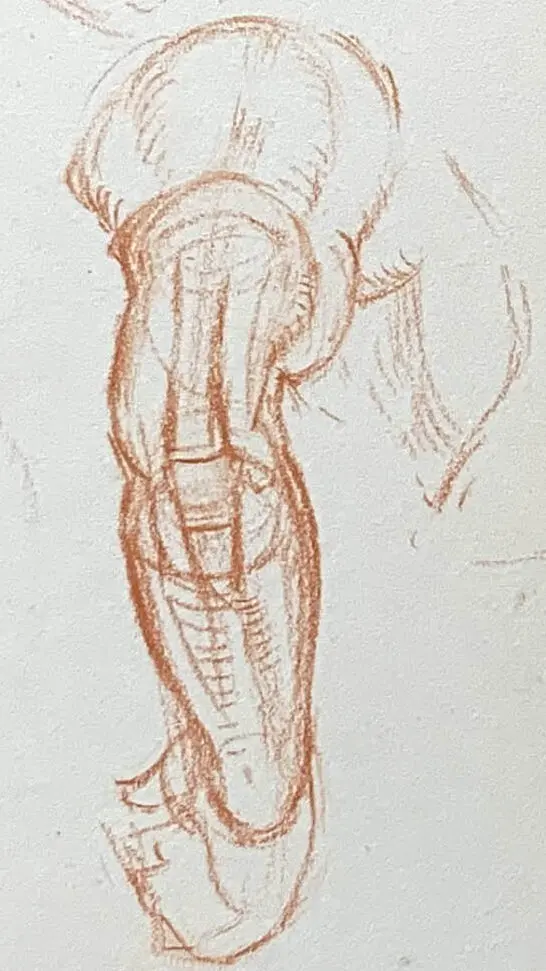
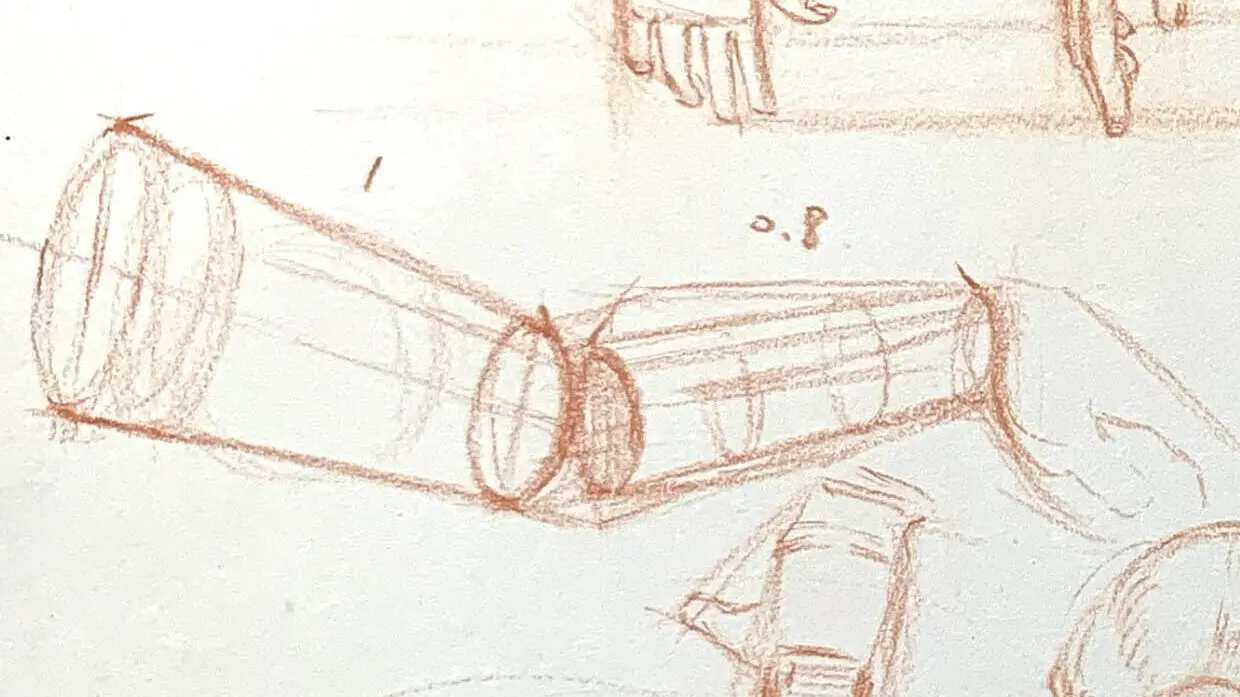
Geometrize your arms into shapes
After understanding the bones and muscles, let's geometrize the arm before we dive into depicting the muscles.
Think of your arm as being made up of a few simple shapes:
upper armThis can be represented by a cylinder, which makes it easier to grasp its basic shape.
Simplified three-side labeling of front and side area transitions
forearmsIt also consists of a cylinder, but is slightly thinner as the forearm narrows near the wrist.
Different angles of the arm, try to draw different movements to deepen our understanding of muscle shape.
elbowsThe elbow joint can be represented as a circle, which is the hub of the upper arm and forearm connection.
Mastering the overall proportions of the arms
Understanding the proportions of your arms can help you draw more natural poses. Here are some basic proportions tips:
Length of the upper armgenerally lower thanLength of forearmAssuming that the upper arm is 1 and the forearm is reduced a bit to about 0.8, this ratio will make the arm look like the actual observed length.
We know this through our bones.Position of the elbowIt's not in the middle of the arm.
How to measure the elbow joint position?
Step One:Draw a vertical line on the paper from the peak of the shoulder to the wrist.
Step 2: Divide the line into 5 parts.The first 3 parts (3/5) are roughly the distance from the shoulder crest to the elbow joint.
The last 2 parts (2/5) are the distance from the elbow joint to the wrist. Roughly find out where the elbow joint should fall at “3/5” of the height of the whole arm.”
Common Arm Sticking Points and How to Deal with Them
Confusing Muscle "Start" and "Stop" Points
ExampleOften, I just remember that the muscle is long, and I don't understand the question, "Does it go from the scapula down to the ulna or the other way around? Or is it the other way around?"
Suggested Solutions:
Color-code the "start point" as a thick line (e.g., red arrow pointing to the upper end of the humerus) and the "stop point" as a thin line + arrow (e.g., purple arrow pointing to radius).
Draw two small diagrams on white paper: label only the starting/stopping points of the muscles and write something like "When I bend my elbow, this muscle from scapula to radius contracts" next to it.
Not understanding muscle hierarchy (which is lateral, which is medial)
Example: Putting all the muscles together in a direct plane gives "no dimension and depth", and often fails to draw the anterior-posterior relationship between the forearm muscle groups.
Suggested Solutions:
Start by sketching the external contour, first drawing the “outermost layer” of the deltoid, biceps, and triceps; then draw in the lower layers of the brachialis, radius, ulnar/distal flexors, and extensors.
Use a lighter pencil (e.g. 2, HB) to emphasize the 'inner muscles' and a darker pencil to partially deepen the 'outer muscles' of the contour to aid understanding of 'which muscles are covered'.
This is an example of the back muscles, where the outer contour is deeper and the inner muscle shapes are shallower.
Unable to grasp the change of muscle from "wide→small→tendon".
phenomenonStudents often draw the entire muscle thickly to the end, and draw the arm and wrist connection in a messy way, stretching the muscle line too long or too thick.
Suggested Solutions:
Demonstrate the gradual change of a muscle from "muscle belly (thickest) → tendon (thinnest) → attached to the bone".
Arm Painting Summary
This time we learned three steps to draw an arm:
1. The first step is to recognize the main bones of the arm, how the upper arm and forearm move, and the shape of the arm under different rotational conditions.
2. recognize muscle groups and understand the order in which muscles wrap around bones as well.
It's all about geometrizing the arm and finally mastering the overall proportions. For beginners, the most important thing is to keep it simple. Instead of focusing on every little detail at the beginning, you should first master the basic shapes and proportions, so that you can gradually build up an understanding of the structure of the arm.
Challenge:
To draw an arm, start with simple geometric shapes, then add muscle details and light and shadow. If you can draw a natural looking arm from different angles, you have a good grasp of the basic structure and proportions of the arm!
Knowledge Points Introduction:
There are several basic three-dimensional structures of the arm shown in the diagram, using the column (cylinder) approach to represent the arm. These structures help us to understand the basic shapes and proportions of the arms.
The upper arm and forearm can be simply visualized as two connected cylinders, with the elbow as the joint between the two.
Method of operation:
Beginners are asked to draw simple cylinders to represent the upper arm and forearm. Instead of drawing details (muscles, etc.), focus on the proportions of the columns and how they look from different angles.
An exercise you can do is to draw different angles of the arms, especially straight and bent arms, to learn how to adjust the length and direction of the cylinder to express different movements.
Which part of the above arm bone knowledge points do you think is the most difficult to draw? Leave a comment and let me know 👋!
If you want to learn to draw, but don't know how to start, or are interested in understanding what drawing is all about.